There’s something delightfully whimsical about Halloween that brings out the kid in all of us. Imagine a platter of Halloween Witch Hat Cookies—pastel-colored, sweet, and magical—sitting coyly on your table, each one a tiny masterpiece of confectionery fun. The moment you bite into these charming Halloween Witch Hat Cookies, the sugary delight dances on your tongue, and the vibrant colors transport you to a candy-filled wonderland.
These cookies aren’t just treats; they’re an experience! Whether you’re hosting a spooky soiree, a classroom party, or simply looking to sweeten up your October afternoons, Halloween Witch Hat Cookies will enchant both kids and adults alike. Plus, they offer the perfect chance to unleash your inner artist as you decorate each one to resemble the hats of your favorite spell-casting witches.
Why You’ll Love This Recipe
These Halloween Witch Hat Cookies are a breeze to whip up, making them ideal for last-minute parties or festive baking sessions with little ones.
Their unique flavor profile combines buttery cookies and rich chocolate, delivering a sweet bite that’s impossible to resist.
The colorful decorations make them visually pop, ensuring they steal the spotlight on any dessert table.
And best of all, they’re not just for Halloween—these whimsical cookies can brighten birthdays, school events, or any celebration year-round.
Ingredients for Pastel Halloween Witch Hat Cookies
Ready to bring some magic to your Halloween dessert table? These Halloween Witch Hat Cookies are both adorable and delicious — the perfect combination of fun, flavor, and festive flair. Here’s what you’ll need to make them:
For the Cookie Dough:
All-Purpose Flour
Provides the sturdy foundation for your Halloween Witch Hat Cookies, ensuring they hold their shape while baking.
Unsalted Butter
Adds richness and tenderness to the dough. Using unsalted butter gives you better control over the overall flavor balance.
Granulated Sugar
Gives sweetness and contributes to the cookie’s golden, crisp edges.
Eggs (2 large)
Bind the ingredients together while adding moisture and structure to your Halloween Witch Hat Cookies.
Baking Powder
The secret to light, slightly fluffy cookies that don’t go flat in the oven.
Vanilla Extract
A splash of pure vanilla adds a warm, cozy aroma that elevates the cookie’s flavor profile.
For Decorating the Witch Hats:
Chocolate Melts
Use dark or milk chocolate to form the iconic pointed hat shape on top of each cookie. They add richness and visual contrast.
Colorful Sprinkles
Edible glitter, pastel jimmies, or festive Halloween sprinkles bring a playful and magical finish to your Halloween Witch Hat Cookies.
The complete list of ingredients, including measurements, is available in the recipe card below. Whether you’re baking for a party or crafting a sweet afternoon project, these cookies are sure to cast a delicious spell on everyone!
How to Make Pastel Halloween Witch Hat Cookies
Ready to conjure up something magical in the kitchen? These Halloween Witch Hat Cookies are not only fun to make but also perfect for parties, trick-or-treat tables, or a cozy baking night at home. Follow these simple steps to bring these enchanting treats to life:
Step 1: Preheat Your Oven
Preheat your oven to 350°F (175°C). While the oven heats up, line two baking sheets with parchment paper. This helps your Halloween Witch Hat Cookies bake evenly and makes cleanup a breeze—because no one wants to scrub trays when there are cookies to be eaten.
Step 2: Cream Butter and Sugar
In a large mixing bowl, cream the softened butter and granulated sugar together until light, fluffy, and pale in color. Use an electric mixer on medium speed for about 3 minutes. This step sets the foundation for tender, flavorful cookies.
Step 3: Add Eggs and Vanilla
Crack in the eggs, one at a time, mixing well after each addition. Then stir in vanilla extract—a splash of cozy aroma that elevates your Halloween Witch Hat Cookies from ordinary to magical. It’s like adding a whisper of fall into every bite.
Step 4: Mix the Dry Ingredients
In a separate bowl, whisk together the all-purpose flour and baking powder. Gradually add the dry mixture into the wet ingredients, mixing just until combined. The dough should be soft and slightly sticky—perfect for shaping.
Step 5: Shape the Cookies
Using a tablespoon or cookie scoop, portion the dough onto your lined baking sheets. Leave space between each cookie because they’ll spread a little while baking—just like witches taking flight!
Step 6: Bake
Bake the cookies for 10–12 minutes, or until the edges are just turning golden brown. Remove from the oven and let them cool on wire racks completely before decorating. This cooling time is key—it ensures the melted chocolate doesn’t run off the cookies.
Step 7: Decorate the Witch Hats
Once cooled, it’s time for the fun part: transforming your cookies into witch hats! Melt your chocolate melts according to the package instructions. Dip one end of each cookie into the chocolate to create the hat’s tip. While the chocolate is still soft, add colorful sprinkles, edible glitter, or pastel jimmies to give each one a magical flair.
Set the decorated cookies aside until the chocolate firms up. Then proudly arrange your Halloween Witch Hat Cookies on platters—they’re perfect for serving, gifting, or simply admiring!
You Must Know
These Pastel Halloween Witch Hat Cookies are not just a sweet treat — they’re edible decor for your Halloween table.
With a short ingredient list, easy steps, and festive charm, they’re perfect for beginner bakers and little helping hands.
Customize them with your favorite chocolate, colors, or even candy embellishments to make every batch uniquely yours.
Whip up a batch today, and your kitchen might just become the most magical place in the house!
Perfecting the Cooking Process for Halloween Witch Hat Cookies
Creating the perfect batch of Halloween Witch Hat Cookies is all about timing, creativity, và một chút kiên nhẫn. Start by baking your cookies until they’re golden at the edges and slightly firm in the center. This gives them the ideal texture — crisp on the outside and tender inside — ready to support the rich chocolate topping.
While your cookies cool on a wire rack, melt your chocolate melts according to package directions. Choose a good-quality chocolate to elevate the flavor and ensure a smooth, glossy finish. While the chocolate is warm, prep your decorative toppings: pastel-colored sprinkles, edible glitter, mini candies, or whatever matches your Halloween theme.
Once the cookies are cool and the chocolate is ready, it’s time for the best part — assembly. This is where the magic truly happens as you dip, drizzle, and decorate each cookie into charming, festive Halloween Witch Hat Cookies that are as beautiful as they are delicious.
Add Your Own Touch
The best part about making Halloween Witch Hat Cookies is how customizable they are. Want a spicier version? Swap the sugar cookie base for gingerbread for a warm, seasonal twist. Prefer a classic chocolate pairing? Use chocolate shortbread or double-chocolate cookie dough as your base.
You can also experiment with different colors and themes:
-
Black and orange for a bold Halloween party
-
Soft pastels for a witchy tea party
-
Metallic gold sprinkles for an elegant touch
Don’t be afraid to make them your own. Every hat tells a different story!
Storing & Reheating
Your Halloween Witch Hat Cookies store beautifully. Place them in an airtight container at room temperature for up to one week. If you live in a warm or humid climate, consider placing parchment paper between layers to avoid sticking.
While these cookies are fantastic at room temp, you can also reheat them gently in a 300°F (150°C) oven for 3–5 minutes to refresh the crispness and lightly melt the chocolate again. It’s like enjoying them straight from the cauldron!
Chef’s Helpful Tips
-
Chill the cookie dough before baking for at least 30 minutes. This helps the cookies retain their shape and prevents excess spreading in the oven.
-
Use high-quality chocolate melts or couverture chocolate for the best taste and texture in the hat decoration.
-
Let your creativity guide the decorating process — there’s no wrong way to design a witch’s hat! From swirling drizzle to sprinkle explosions, each cookie becomes a miniature edible masterpiece.
Frequently Asked Questions (FAQs) About Halloween Witch Hat Cookies
What are Pastel Halloween Witch Hat Cookies?
Halloween Witch Hat Cookies are whimsical, festive treats that combine classic cookie flavors with enchanting Halloween design. These cookies are typically shaped like witch hats and decorated with pastel-colored icing or melted chocolate, making them a standout on any Halloween dessert table.
Their playful appearance and sweet flavor appeal to both kids and adults. Whether you’re planning a spooky party or simply want to bake something charming and creative, Halloween Witch Hat Cookies are a perfect choice.
How do I decorate Halloween Witch Hat Cookies?
Decorating Halloween Witch Hat Cookies is where the real fun begins. After baking your cookies—usually in a round or triangular shape—you’ll want to melt chocolate to form the hat’s tip. Then, use pastel-colored icing, candy melts, or royal icing to add stripes, stars, or belt-like bands across the “hats.”
For a truly magical finish, sprinkle on edible glitter, sugar pearls, or seasonal sprinkles. You can use piping bags or squeeze bottles to apply details with precision. Let the decorations set completely before serving or packaging. The best part? Every cookie can be uniquely yours!
Can I use different colors for Halloween Witch Hat Cookies?
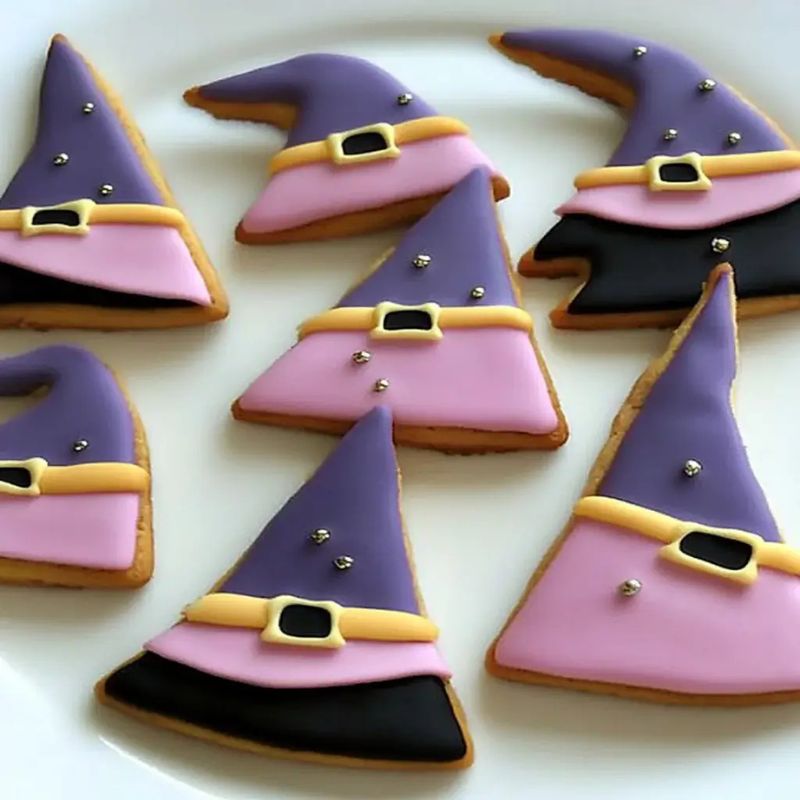
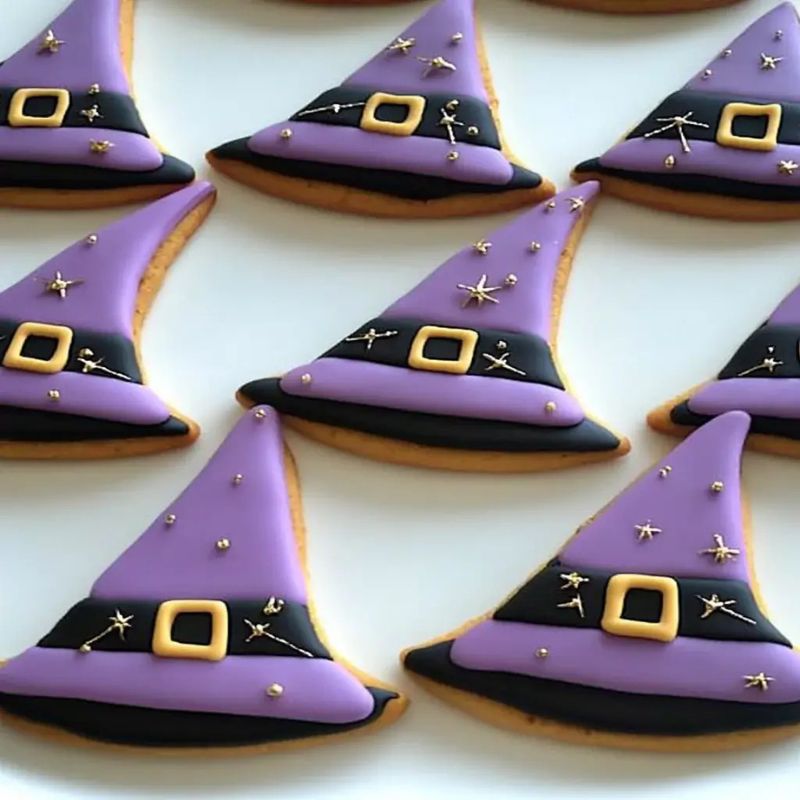
Yes, absolutely! While pastel shades like lavender, mint, and peach are popular for a soft, whimsical Halloween look, you’re free to use any colors that suit your theme.
Want something more traditional? Go for black, orange, purple, and neon green. Hosting an elegant Halloween soirée? Try metallic golds, silvers, and deep jewel tones. The beauty of Halloween Witch Hat Cookies lies in their versatility — your imagination is the limit!
How can I store Halloween Witch Hat Cookies?
To keep your Halloween Witch Hat Cookies fresh and picture-perfect, store them in an airtight container at room temperature for up to one week. Line layers with parchment or wax paper if you’ve stacked them to prevent decorations from smudging.
For longer storage:
-
Refrigerate them for up to 2 weeks (just ensure they’re well-wrapped).
-
Freeze undecorated cookies for up to 2 months. Simply thaw at room temperature and decorate before serving.
-
Avoid direct sunlight or warm environments once decorated, as chocolate and icing can melt or smear.
Conclusion: Pastel Halloween Witch Hat Cookies
In summary, Pastel Halloween Witch Hat Cookies are the perfect blend of creativity, flavor, and festive fun. With their whimsical design and soft pastel colors, these cookies bring a magical touch to any Halloween celebration — whether you’re hosting a themed party, packing school treats, or simply enjoying a cozy afternoon in the kitchen.
Their appeal goes far beyond looks. These Halloween Witch Hat Cookies are also buttery, sweet, and easy to prepare, making them a hit with both kids and adults. Decorating them allows you to tap into your artistic side and customize each one to match your Halloween mood — from playful pastels to bold, spooky tones.
When stored properly, these cookies maintain their texture and charm for days, making them perfect for prepping ahead or gifting. Whether you bake them with family or share them at a festive gathering, Halloween Witch Hat Cookies are guaranteed to enchant every bite and bring smiles all around.
So grab your mixing bowl, fire up the oven, and embrace the spirit of Halloween with these delightful, witchy creations!
About HealthyBlog365
Welcome to HealthyBlog365, your go-to destination for all things food and drink. We believe that every meal is not just a way to nourish your body but also a meaningful connection with yourself and your loved ones.
HealthyBlog365 was created with a mission to inspire healthy living through nutritious meals and refreshing beverages. Here, you’ll discover a treasure trove of creative recipes, kitchen tips, and healthy eating trends tailored to fit modern lifestyles.
 What can you find on HealthyBlog365?
- Delicious and easy-to-make recipes: From simple meals for busy mornings to wholesome dinners for family gatherings, we’ve got you covered for every occasion.
- Nutritious drinks: Explore recipes for juices, smoothies, detox teas, and drinks that cleanse your body, boost your mood, and energize your day.
- Guides on eating habits: Get detailed insights into popular diets like keto, low-carb, and vegetarian-friendly meal plans.
- Kitchen hacks: Discover smart tips to save time, preserve food, and cook more efficiently.
We are committed to providing high-quality content, staying up-to-date with the latest trends, and maintaining a balance between nutrition and flavor.
 Connect with HealthyBlog365 on Social Media
Join the HealthyBlog365 community on social media platforms to stay updated with our latest posts, watch exciting tutorials, and share your food stories with us:
 Facebook: Follow us here to stay updated with our latest posts and join our community.
 Instagram: Check us out here for inspiring visuals and ideas.
 Pinterest: Pin with us here to save creative ideas you’ll love.
 YouTube: Subscribe here for detailed tutorials and exciting videos.
 Thank You for Supporting HealthyBlog365!
We aim to build a connected community where everyone can share and learn from each other. If you have any questions or suggestions, don’t hesitate to reach out to us via social media or our website.
We hope you have a wonderful time on HealthyBlog365 and find new inspiration for your healthy culinary journey!

Witch Hat Cookies
 Prep Time 20 minutes Cook Time 12 minutes Total Time 32 minutes
 Description
Ingredients
- all-purpose flour
- unsalted butter, softened
- granulated sugar
- large eggs
- baking powder
- vanilla extract
- chocolate melts (dark or milk)
- Colorful sprinkles
Instructions
- Preheat your oven to 350°F (175°C) and line two baking sheets with parchment paper.
- In a large bowl, cream together softened butter and granulated sugar until light and fluffy (about 3 minutes).
- Add eggs one at a time, mixing well after each addition, then stir in vanilla extract.
- In another bowl, whisk flour and baking powder together. Gradually add this mixture to the wet ingredients until fully combined.
- Scoop tablespoon-sized portions of dough onto prepared baking sheets, spacing them apart.
- Bake for 10-12 minutes or until edges turn golden brown. Cool on wire racks before decorating.
- Melt chocolate according to package instructions and dip one end of each cookie into the chocolate before adding colorful sprinkles.