Ever wondered why the Homemade Cherry Cheese Danish is one of the most beloved sweet breakfast treats? It transforms an ordinary morning into a special culinary experience that feels both comforting and indulgent.
Picture yourself biting into a flaky, golden pastry layered with smooth cream cheese and a luscious cherry filling. A Homemade Cherry Cheese Danish isn’t just a pastry—it’s a flavorful journey that delights your taste buds and elevates your breakfast routine.
This popular cream cheese pastry brings together the richness of cream cheese and the sweetness of ripe cherries, all wrapped in delicate layers of buttery puff pastry. Every bite of a Homemade Cherry Cheese Danish delivers the perfect blend of textures and flavors—crispy, creamy, and fruity.
Key Takeaways
-
Homemade Cherry Cheese Danish offers a perfect balance of sweet and creamy flavors
-
Puff pastry provides a light, flaky texture in every bite
-
Great for breakfast, brunch, or even dessert
-
Simple to make with just a few ingredients
-
Versatile and customizable with different fruit fillings
The History and Origins of Danish Pastries
The story behind the Homemade Cherry Cheese Danish and other Danish baked goods is a fascinating journey through European culinary history. These pastries have traveled across borders, starting in the grand kitchens of Vienna before becoming a cherished national treat in Denmark—and eventually, a beloved breakfast item in homes across America.
Imagine stepping into an old-world Danish bakery nestled in a European village. The air is warm with the scent of freshly baked pastries, golden and flaky, filled with rich cream and sweet cherries. This timeless craft is the heritage behind every Homemade Cherry Cheese Danish served today.
From Vienna to Denmark: A Journey of Pastry Evolution
The origins of Danish pastry trace back to the 19th century, when Austrian bakers brought with them the technique of laminated dough—layering butter within the dough to create a tender, flaky texture. Danish bakers embraced this style and added their own twist, resulting in the light, buttery pastry we recognize today in a Homemade Cherry Cheese Danish.
-
Austrian laminated dough technique introduced in the 1800s
-
Danish bakers refined the method for a lighter, more delicate texture
-
Gave rise to pastries known for melt-in-your-mouth layers and rich fillings
This evolution turned Danish pastries into more than just a treat—it made them a symbol of baking artistry.
How the Danish Pastry Became an American Breakfast Staple
The arrival of Danish pastries in America—particularly the Homemade Cherry Cheese Danish—is closely tied to immigrant culture and baking excellence. In Racine, Wisconsin, which became known as the most Danish city outside Denmark, traditional bakeries like O&H Danish Bakery helped make these pastries a household favorite.
-
Danish immigrants brought authentic pastry techniques to the U.S.
-
Racine, WI played a key role in preserving and spreading the tradition
-
Bakeries popularized the Homemade Cherry Cheese Danish as a staple for breakfast and brunch
Today, thanks to generations of bakers and cultural exchange, the Homemade Cherry Cheese Danish is both a nostalgic favorite and a fresh-baked indulgence that celebrates the artistry of European baking.
What Makes a Homemade Cherry Cheese Danish Special
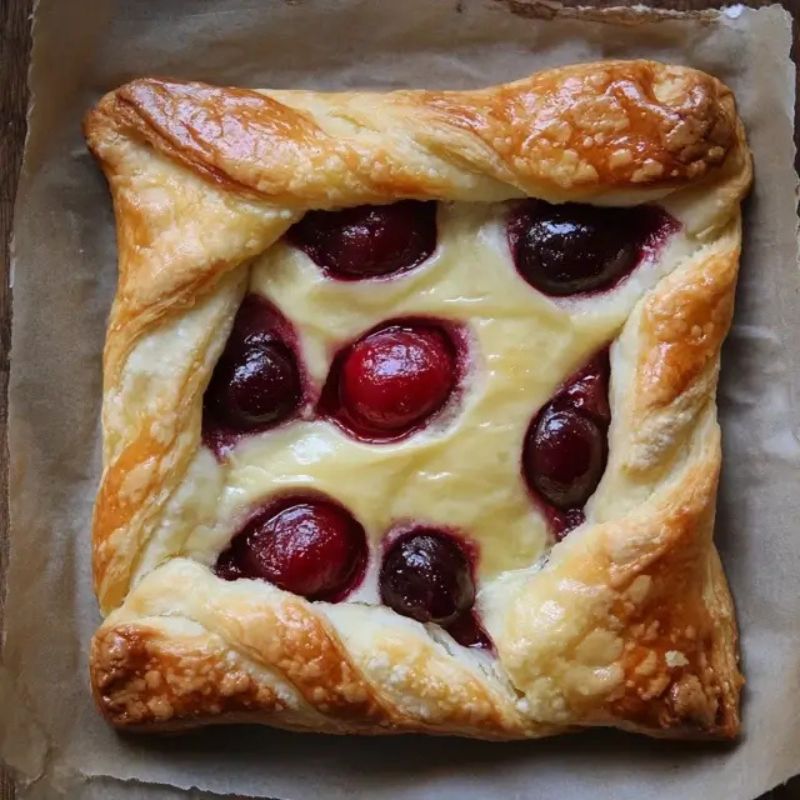
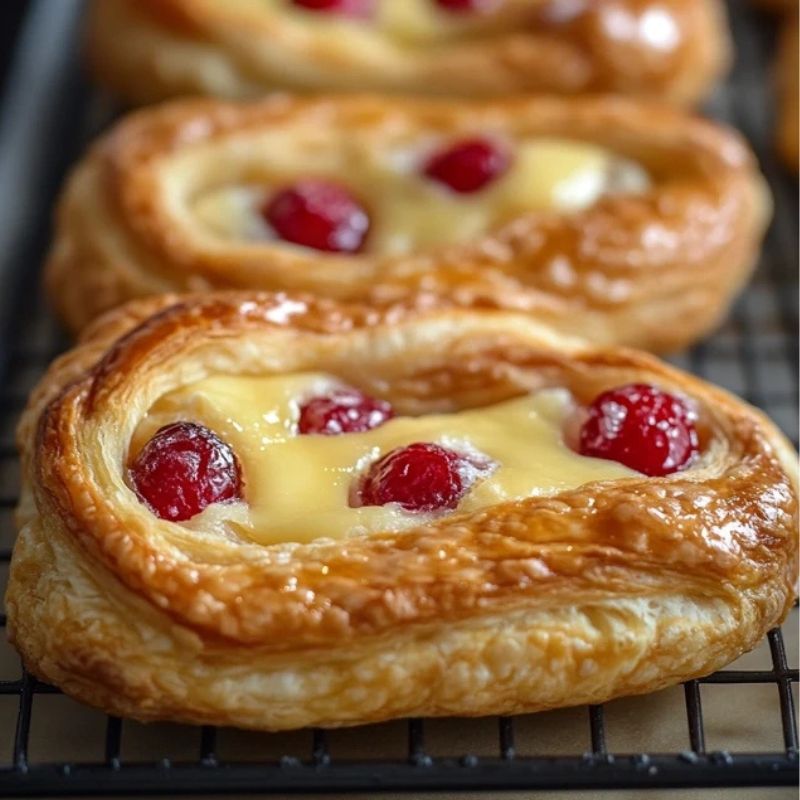
The Homemade Cherry Cheese Danish is more than just a pastry—it’s a timeless treat that combines delicate textures, rich flavors, and irresistible aroma. Its visual appeal and flavor depth make it a standout in the world of sweet baked goods.
Imagine a golden, flaky danish resting on a plate, with ribbons of sweet cherry preserves and smooth cream cheese nestled inside. Every bite of this Homemade Cherry Cheese Danish offers the perfect balance of buttery crispness, tangy filling, and fruity sweetness.
Here’s what makes it truly special:
-
Flaky Pastry Layer: Golden-brown and crisp, offering a light and airy base
-
Cream Cheese Filling: Smooth, tangy, and lightly sweetened for richness
-
Cherry Topping: Juicy cherry preserves or homemade compote that adds vibrant flavor and color
The textures in a Homemade Cherry Cheese Danish are part of its charm. The exterior is crisp and layered, while the interior is luxuriously creamy. The cherries bring a burst of sweet-tart contrast that enhances the entire experience.
Pastry chefs and home bakers alike take pride in crafting these danishes with care. From shaping the dough to layering the fillings just right, each step reflects precision and passion—turning a humble danish into a bakery-worthy delight.
With approximately 275 calories per serving, it’s a satisfying yet light indulgence, ideal with your morning coffee or as an afternoon snack.
Essential Ingredients for the Perfect Homemade Cherry Cheese Danish
Crafting the best Homemade Cherry Cheese Danish starts with selecting the right ingredients. Quality components bring out the best in flavor, texture, and appearance.
Choosing the Right Puff Pastry
You have two main options when making the pastry base:
-
Store-bought frozen puff pastry sheets – convenient and consistent
-
Homemade laminated dough – traditional and ultra-flaky if you have time
Cream Cheese and Cherry Filling
A luscious filling is the heart of every Homemade Cherry Cheese Danish. Here’s a classic filling formula:
| Ingredient | Quantity |
|---|---|
| Cream Cheese | 8 oz (brick style) |
| Sugar | 1/4 cup |
| Vanilla Extract | 1/2 teaspoon |
| Cherry Pie Filling | 1/2 can (15 oz) |
You can also make a homemade cherry compote using fresh or frozen cherries (see steps below).
Additional Ingredient Tips and Substitutions
-
Use vegan cream cheese for dairy-free diets
-
Replace cherries with blueberries, raspberries, or seasonal fruit
-
Substitute honey, maple syrup, or monk fruit sweetener to suit preferences
Pro tip: Chill the cream cheese mixture for 10–15 minutes before assembling. It spreads more easily and bakes evenly.
Step-by-Step Preparation Guide

A beautifully crafted Homemade Cherry Cheese Danish is easy to make with the right technique and a little patience. Follow these steps for bakery-style results at home:
Prepare the Puff Pastry
-
Roll out cold puff pastry on a lightly floured surface
-
Keep it chilled to maintain its structure
-
Cut into evenly sized rectangles or braid shapes
Make the Cream Cheese Filling
-
In a bowl, blend softened cream cheese with sugar
-
Add vanilla extract and mix until smooth and fluffy
Optional: Make Homemade Cherry Filling
| Ingredient | Quantity | Note |
|---|---|---|
| Fresh Cherries | 2 cups | Pitted and halved |
| Granulated Sugar | 1/2 cup | Adjust to taste |
| Cornstarch | 2 tbsp | Helps thicken the compote |
Simmer cherries, sugar, and cornstarch over medium heat until thickened. Cool slightly before using.
Assemble Your Danish
-
Spread cream cheese mixture in the center of each pastry strip
-
Add a spoonful of cherry filling on top
-
Create a braided or folded design by overlapping side strips
-
Brush edges with egg wash for golden finish
Bake and Serve
-
Bake at 350°F (175°C) for 14–16 minutes until puffed and golden
-
Let cool slightly before serving—this helps the filling set
Serve warm or room temperature with a dusting of powdered sugar or a drizzle of glaze if desired.
Tips for Achieving the Perfect Texture and Flavor in a Homemade Cherry Cheese Danish
Crafting the ultimate Homemade Cherry Cheese Danish requires more than just good ingredients—it takes precision, patience, and attention to detail. These breakfast pastries may seem simple, but perfecting them brings bakery-quality results right to your kitchen.
With the right techniques, your Homemade Cherry Cheese Danish will have a beautifully flaky crust, a rich and creamy center, and just the right amount of sweet cherry filling in every bite.
Temperature Control Techniques
One of the most important elements in baking a successful Homemade Cherry Cheese Danish is mastering temperature control:
-
Refrigerate cream cheese until just before mixing to maintain structure and freshness
-
Use butter that’s cool but slightly soft—this helps the puff pastry achieve its signature layers without becoming greasy
-
Preheat your oven to a precise 400°F (200°C) to ensure even baking and consistent color
Maintaining proper temperatures throughout the preparation process helps ensure a light, flaky texture and prevents soggy bottoms.
Proper Filling Distribution Methods
The filling is the heart of every Homemade Cherry Cheese Danish. Distribute it with care to keep everything neat, flavorful, and balanced:
-
Use about 1 tablespoon of cherry pie filling per pastry
-
Create a slight well in the center of the cream cheese to help hold the cherries in place
-
Leave a small border (about ½ inch) around the edges to prevent leakage while baking
This technique ensures each bite has an ideal combination of crisp pastry, creamy cheese, and bright cherry flavor.
Baking Time and Temperature Guidelines
Here’s a quick guide to help you get the best results when baking your Homemade Cherry Cheese Danish:
| Baking Parameter | Recommended Setting |
|---|---|
| Oven Temperature | 400°F (200°C) |
| Baking Time | 16–18 minutes |
| Cooling Time | 5–10 minutes before serving |
Pro tip: Watch closely in the final minutes. A golden-brown crust is your visual cue that the danish is perfectly baked with a crisp exterior and soft, gooey center.
Serving Suggestions and Presentation Ideas
A Homemade Cherry Cheese Danish is delicious on its own, but thoughtful presentation can turn it into a showstopping centerpiece—perfect for brunch, holiday breakfasts, or afternoon tea.
Enhance the look and taste with these easy garnishing ideas:
-
Dust with powdered sugar for a classic bakery-style touch
-
Drizzle with vanilla glaze for added sweetness and shine
-
Top with fresh cherries or mint leaves to add color and freshness
Choose your serving temperature based on the experience you want to offer:
-
Warm – brings out the melty, creamy cheese center
-
Room temperature – preserves structure and flakiness
-
Slightly chilled – creates a cool, creamy contrast perfect for warm weather
Best Pairings for a Homemade Cherry Cheese Danish
Pair your pastry with beverages that complement its flavors and texture:
-
A cup of freshly brewed coffee for a cozy morning bite
-
Earl Grey or herbal tea to highlight the subtle vanilla notes
-
A light sparkling wine for brunch or special occasions
-
Cold milk for a comforting, nostalgic feel
Whether you’re plating a single Homemade Cherry Cheese Danish or arranging a tray for guests, focus on visual harmony. Use decorative plates, a dusting of sugar, and a garnish to create a memorable presentation that pleases the eye as much as the palate.
Storage and Freshness Tips for Your Homemade Cherry Cheese Danish
Enjoying a warm, flaky Homemade Cherry Cheese Danish doesn’t have to end after the first bite. With proper storage methods, you can keep your pastries fresh, delicious, and ready to enjoy for days after baking.
Whether you’ve made a small batch or a full tray of Homemade Cherry Cheese Danish, these storage and reheating tips will help preserve their flavor and texture.
Proper Storage Methods
Keeping your Homemade Cherry Cheese Danish fresh is all about protecting its delicate pastry and creamy filling. Here’s how to do it right:
Room Temperature Storage
-
Store in an airtight container to prevent drying out
-
Keep at room temperature for up to 1–2 days
-
Avoid direct sunlight and heat
Refrigeration Techniques
-
Wrap each danish individually in plastic wrap to lock in moisture
-
Place in a sealed container to maintain freshness
-
Store in the refrigerator for up to 5 days
Freezing Options
-
Wrap tightly in plastic wrap and foil or use freezer-safe bags
-
Store in the freezer for up to 2 months
-
Thaw overnight in the refrigerator before reheating
Reheating Guidelines
Want to bring that bakery-fresh taste back to your Homemade Cherry Cheese Danish? Use these simple reheating methods:
| Reheating Method | Temperature | Time | Result |
|---|---|---|---|
| Microwave | High | 15–20 seconds | Soft and warm |
| Toaster Oven | 300°F (150°C) | 5–7 minutes | Lightly crisped exterior |
| Conventional Oven | 300°F (150°C) | 5–7 minutes | Flaky, restored texture |
Pro tip: Always inspect your danish before reheating. If it smells off, has visible mold, or feels slimy, it’s safer to discard it.
Variations and Creative Twists
Elevate your Homemade Cherry Cheese Danish game by experimenting with exciting flavors and seasonal ingredients. Cream cheese pastries are incredibly versatile, and a few creative changes can make them truly unique.
Seasonal Fruit Variations
-
Summer: Fresh peach or mixed berry filling
-
Fall: Spiced pumpkin and cream cheese
-
Winter: Cranberry with orange zest
-
Spring: Lemon curd and raspberry
Flavor Enhancement Techniques
-
Add lemon or orange zest to brighten the cream cheese
-
Try almond or vanilla extract for depth of flavor
-
Sprinkle cinnamon or nutmeg for a warm, cozy twist
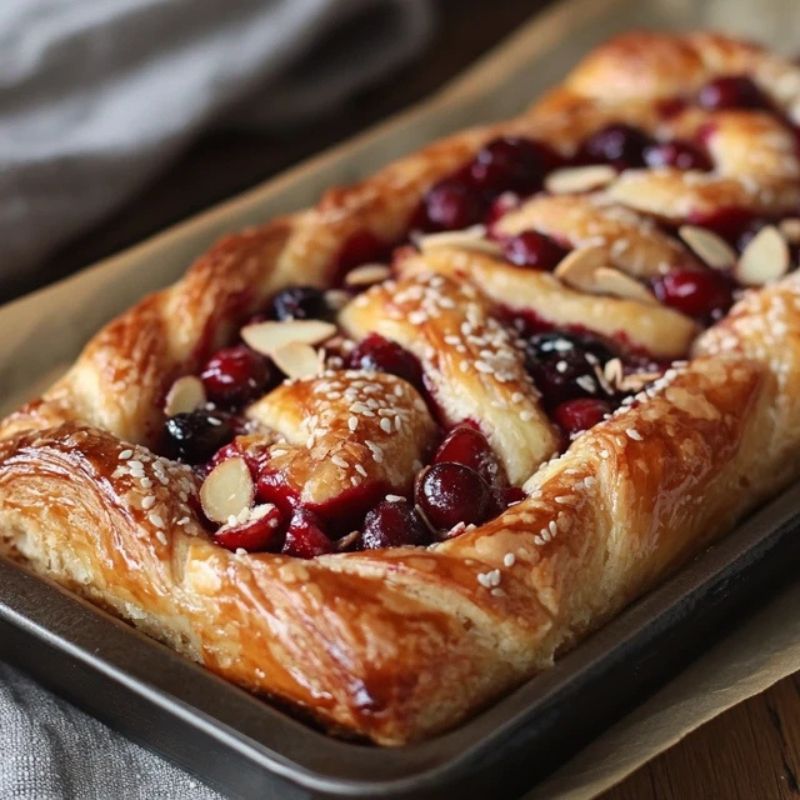
Creative Shapes to Try
-
Braided danishes for an eye-catching breakfast centerpiece
-
Round individual pastries for elegant brunch servings
-
Danish “sandwiches” layered with double filling
| Variation Type | Flavor Profile | Prep Time |
|---|---|---|
| Blueberry Cream Cheese | Tangy and sweet | 40 minutes |
| Apricot Almond | Nutty and fruity | 45 minutes |
| Chocolate Swirl | Rich and decadent | 50 minutes |
Baking a Homemade Cherry Cheese Danish is just the beginning. Explore different combinations, mix in new fruits, or try unique spices—you might stumble upon your next family favorite. Whether for holidays, brunches, or everyday treats, these danishes are as customizable as they are delicious.
FAQ: Homemade Cherry Cheese Danish
1. What is a Homemade Cherry Cheese Danish?
A flaky puff pastry filled with sweetened cream cheese and cherry preserves, baked until golden. It’s a classic, easy-to-make breakfast or dessert treat.
2. Is it hard to make at home?
No! Use store-bought puff pastry and follow a simple method—great results with minimal effort.
3. Can I use frozen or canned cherries?
Yes, both work well. Just drain excess liquid to keep the pastry crisp.
4. How long does it stay fresh?
-
Room temp: 1–2 days
-
Fridge: up to 5 days
-
Freezer: up to 1 month (wrap well)
5. Are there vegan options?
Yes! Use vegan puff pastry and dairy-free cream cheese.
6. Any fun variations?
Try blueberry, raspberry, or apricot fillings. Add lemon zest, almond extract, or change the shape for a unique twist.
7. How do I reheat it?
-
Oven: 350°F for 5–7 mins (best texture)
-
Microwave: 15–20 secs (faster, but softer)
8. Can I prep in advance?
Yes! Assemble and chill for 24 hours, or freeze unbaked and bake when needed.
Conclusion
The Homemade Cherry Cheese Danish is more than just a pastry—it’s a celebration of tradition, flavor, and creativity. From its European roots to its place on American breakfast tables, this treat brings joy with every flaky, fruity bite.
By learning the basics—from ingredient selection to temperature control—you now have the skills to bake this classic at home. Whether for breakfast, brunch, or dessert, the Homemade Cherry Cheese Danish is simple to make and easy to customize.
Start baking today and let the sweet aroma fill your kitchen. With every bite, you’ll enjoy a pastry that’s as rich in history as it is in flavor.
About HealthyBlog365
Welcome to HealthyBlog365, your go-to destination for all things food and drink. We believe that every meal is not just a way to nourish your body but also a meaningful connection with yourself and your loved ones.
HealthyBlog365 was created with a mission to inspire healthy living through nutritious meals and refreshing beverages. Here, you’ll discover a treasure trove of creative recipes, kitchen tips, and healthy eating trends tailored to fit modern lifestyles.
 What can you find on HealthyBlog365?
- Delicious and easy-to-make recipes: From simple meals for busy mornings to wholesome dinners for family gatherings, we’ve got you covered for every occasion.
- Nutritious drinks: Explore recipes for juices, smoothies, detox teas, and drinks that cleanse your body, boost your mood, and energize your day.
- Guides on eating habits: Get detailed insights into popular diets like keto, low-carb, and vegetarian-friendly meal plans.
- Kitchen hacks: Discover smart tips to save time, preserve food, and cook more efficiently.
We are committed to providing high-quality content, staying up-to-date with the latest trends, and maintaining a balance between nutrition and flavor.
 Connect with HealthyBlog365 on Social Media
Join the HealthyBlog365 community on social media platforms to stay updated with our latest posts, watch exciting tutorials, and share your food stories with us:
 Facebook: Follow us here to stay updated with our latest posts and join our community.
 Instagram: Check us out here for inspiring visuals and ideas.
 Pinterest: Pin with us here to save creative ideas you’ll love.
 YouTube: Subscribe here for detailed tutorials and exciting videos.
 Thank You for Supporting HealthyBlog365!
We aim to build a connected community where everyone can share and learn from each other. If you have any questions or suggestions, don’t hesitate to reach out to us via social media or our website.
We hope you have a wonderful time on HealthyBlog365 and find new inspiration for your healthy culinary journey!

Homemade Cherry Cheese Danishes
 Prep Time 15 minutes Cook Time 20 minutes Total Time 35 minutes
 Description
Ingredients
- puff pastry thawed
- cream cheese
- sugar
- vanilla extract
- lemon juice
- lemon zest
- egg for egg wash, beaten with 1 tablespoon water
- cherry pie filling
- sugar
- milk
- vanilla extract
Instructions
- Step 1: Preheat And Prepare Puff PastryPreheat oven to 400°F (200°C). Line a baking sheet with parchment paper.Roll out the puff pastry and cut into 8 equal squares.
- Step 2: Make the Cream Cheese FillingIn a bowl, beat cream cheese, sugar, vanilla extract, lemon juice, and lemon zest until smooth.
- Step 3: Assemble the DanishPlace a spoonful of cream cheese mixture in the center of each pastry square.Top with 1-2 tablespoons of cherry pie filling.Fold the corners slightly inward or leave open for a classic Danish look.Brush edges with egg wash for a golden finish.
- Step 4: BakeBake for 18-20 minutes or until golden brown and puffed up.Let cool for 5 minutes before glazing.
- Step 5: Add the GlazeWhisk together powdered sugar, milk, and vanilla to form a smooth glaze.Drizzle over the warm Danishes.