
Tiramisu icebox cake offers all the rich flavors of classic Italian tiramisu without the food safety concerns. While traditional tiramisu recipes often include raw eggs that can pose a Salmonella risk, this no-bake version eliminates that worry entirely. Instead, we’ve created a dessert that maintains those signature espresso and mascarpone flavors you love, but in a more accessible format.
Preparing this Tiramisu Icebox Cake takes only about 30 minutes of your time, but the results are certainly impressive enough for any gathering. With layers of coffee-soaked ladyfingers or graham crackers that absorb flavors beautifully, this dessert can be refrigerated for up to 48 hours before serving. This makes it perfect for entertaining since you can prepare it a day or two in advance. Furthermore, this recipe serves 12 people, making it ideal for summer parties or family gatherings when you need a crowd-pleasing dessert that doesn’t keep you in the kitchen.
Choosing the Right Ingredients for Tiramisu Icebox Cake
The success of your tiramisu icebox cake hinges on selecting quality ingredients that complement each other. Let’s examine the critical components that will make your dessert truly exceptional.
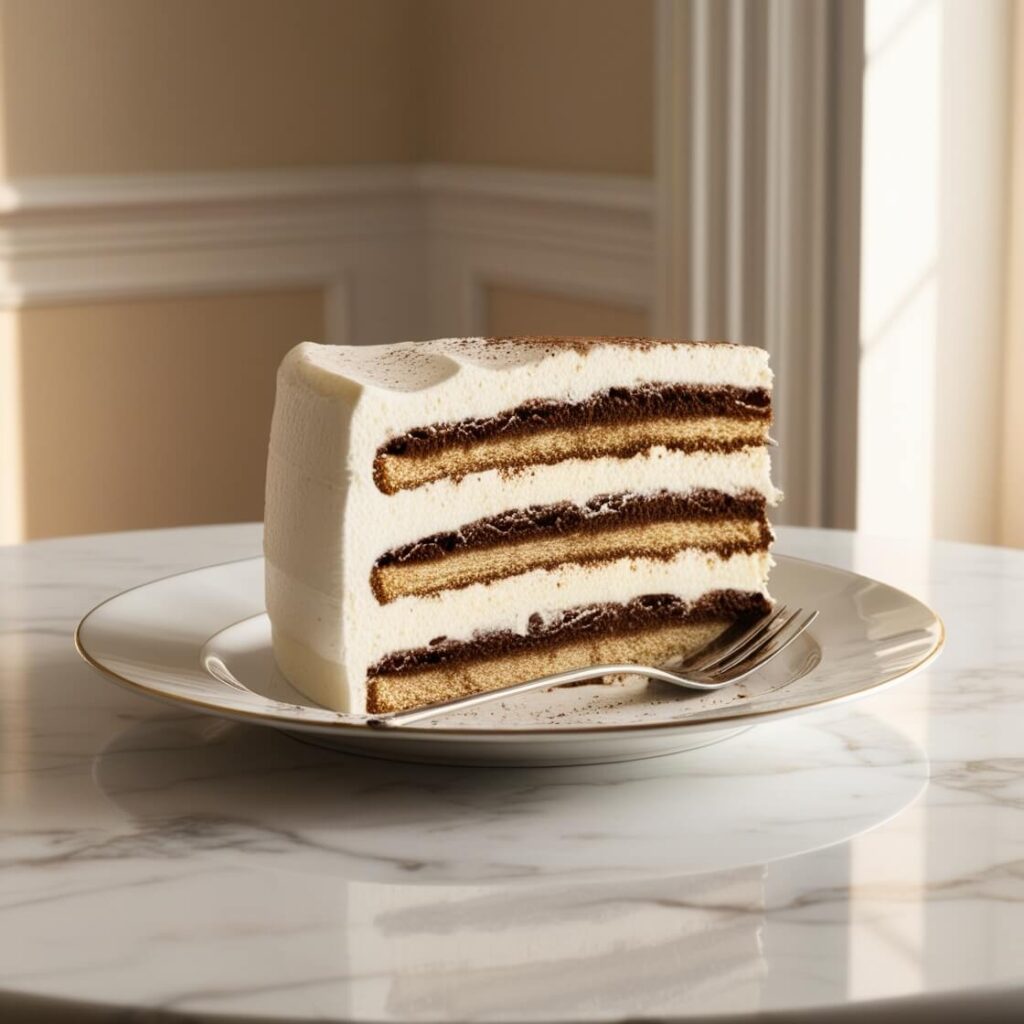
Tiramisu Icebox Cake – layers of creamy bliss with a coffee kick!
Mascarpone vs. Cream Cheese: What Works Best
Mascarpone is the traditional choice for authentic tiramisu flavor. This Italian cheese has a significantly higher fat content than cream cheese—up to 75% butterfat. This richness creates that luxurious, velvety mouthfeel tiramisu is known for. Mascarpone’s mild, sweet character allows the coffee and liqueur flavors to shine through.
Cream cheese can work as a substitute in a pinch, though it produces a different result. It contains a minimum of 33% milk fat and has a tangier, saltier profile. If using cream cheese, you’ll need to soften it thoroughly and modify it slightly. For best results, mix 8 ounces of room-temperature cream cheese with up to ¼ cup of heavy whipping cream. This improves the texture, making it lighter and more similar to mascarpone.
Coffee, Espresso, or Liqueur: Flavor Base Options
The coffee component provides the distinctive bitter note that balances the creamy sweetness. Instant espresso powder (about 2 teaspoons) mixed with water creates a concentrated flavor base. Alternatively, strongly brewed coffee works well for a more accessible option.
For the alcohol component, several options enhance the flavor profile:
- Sweet Marsala wine (traditional Italian choice)
- Kahlúa or coffee liqueur
- Rum or rum extract
- Amaretto
Many recipes combine both coffee and liqueur—typically ¾ cup strong brewed coffee with ¼ cup liqueur. This creates the perfect soaking liquid for your cookies, delivering that signature tiramisu taste.
Best Cookies to Use: Ladyfingers, Wafers, or Graham Crackers
Ladyfingers are the classic choice. These light, spongy cookies absorb the coffee mixture perfectly without becoming overly soggy. Look for “Savoiardi” ladyfingers for the most authentic version. One technique is to dip them quickly—about one minute per side—so they soak up flavor without falling apart.
Chocolate wafer cookies offer an interesting variation, adding a deeper chocolate flavor. Approximately 55 chocolate wafers (about 1½ nine-ounce boxes) create excellent layers with contrasting flavor.
Graham crackers present a widely available alternative. They provide good structure and absorb the coffee mixture well. They’re particularly useful if you can’t locate ladyfingers, though the texture and flavor profile will naturally differ from traditional tiramisu.
Regardless of which cookie you choose, the key is controlling soaking time—too little and they’ll remain dry; too much and they’ll disintegrate.
Step-by-Step Assembly Process
Assembling a tiramisu icebox cake requires precision and patience, but the results are well worth the effort. Let’s break down the process into manageable steps that will help you create perfect layers of flavor and texture.
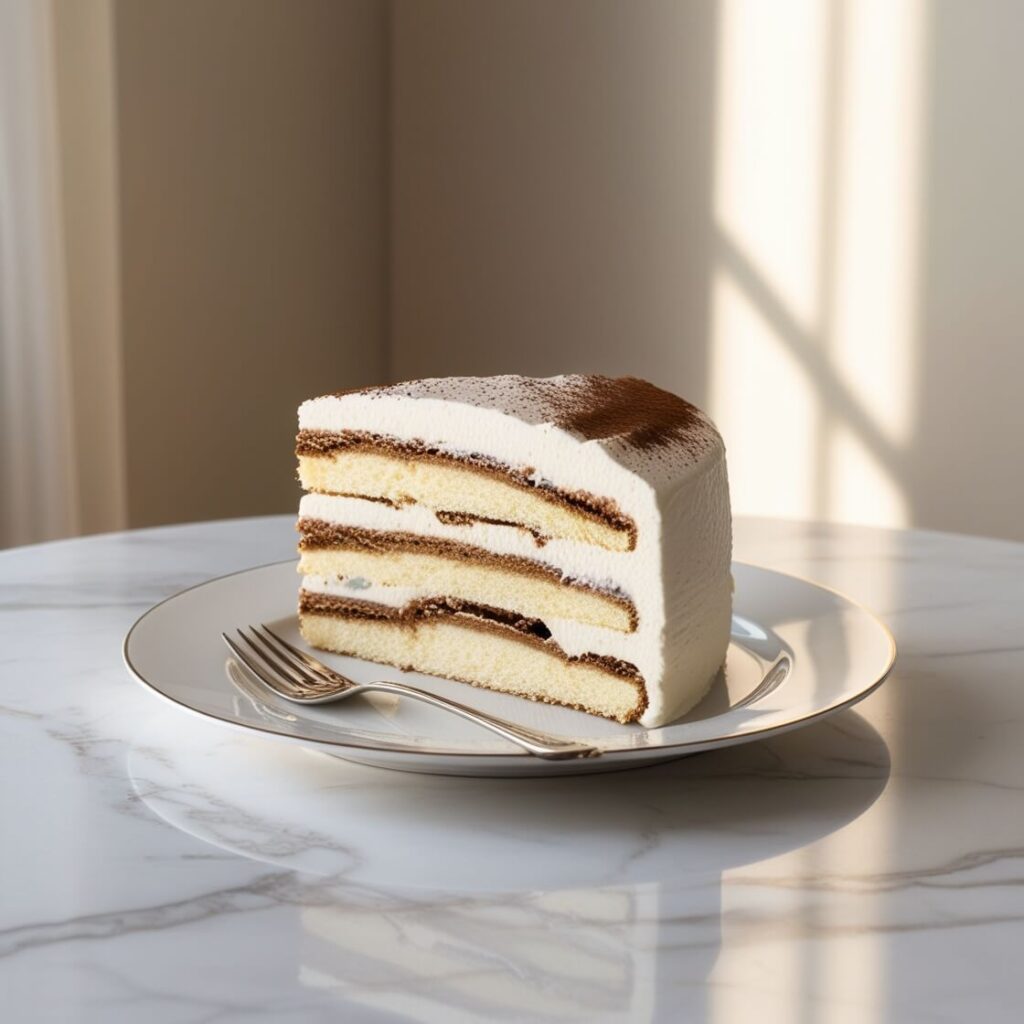
💡 No-bake dessert magic: espresso, mascarpone, and sweet perfection.
Prepare the Cream Mixture
The foundation of any tiramisu icebox cake is the luscious mascarpone cream. Initially, place egg yolks in a medium bowl. Meanwhile, create a hot syrup by combining sugar, instant espresso powder, vanilla extract, salt, and water in a saucepan over medium heat. Once boiling, gradually stream this hot syrup into the egg yolks while beating constantly with an electric mixer. This technique effectively pasteurizes the yolks. After that, increase the speed to medium-high and beat until the mixture becomes light, thick, and mousse-like – about 3 minutes.
Next, beat chilled mascarpone and heavy cream in a separate bowl until stiff peaks form (approximately 1 minute). Gently fold in the egg yolk mixture, then beat again until stiff peaks return.
Dip and Layer the Cookies
Start by spreading a thin layer (about ½ cup) of the mascarpone mixture across the bottom of your prepared pan. Working one cookie at a time, quickly dunk ladyfingers into the coffee mixture – just a second or two is sufficient. Arrange these in a tight-fitting row over the cream layer. The quick dip is crucial – too long and they’ll disintegrate, too brief and they’ll remain dry.
Repeat Layers for Structure and Flavor
Once your first layer is complete, add another cup of the mascarpone mixture, spreading it evenly. Repeat the dipping and arranging process for a second layer of ladyfingers. Top with another cup of cream mixture, creating distinct layers that will meld together during chilling.
Final Layer and Smoothing the Top
For the final layer, arrange dipped ladyfingers on top, then cover with the remaining mascarpone mixture. Smooth the surface carefully with an offset spatula, ensuring even coverage. Prior to serving, cover the cake with plastic wrap and refrigerate for at least 8 hours (or up to 48 hours) to allow the flavors to meld and the cookies to soften to the perfect texture.
Chilling and Make-Ahead Tips
The proper chilling time for tiramisu icebox cake isn’t just a suggestion—it’s essential for transforming individual components into a cohesive dessert. Patience truly pays off when making this no-bake treat.
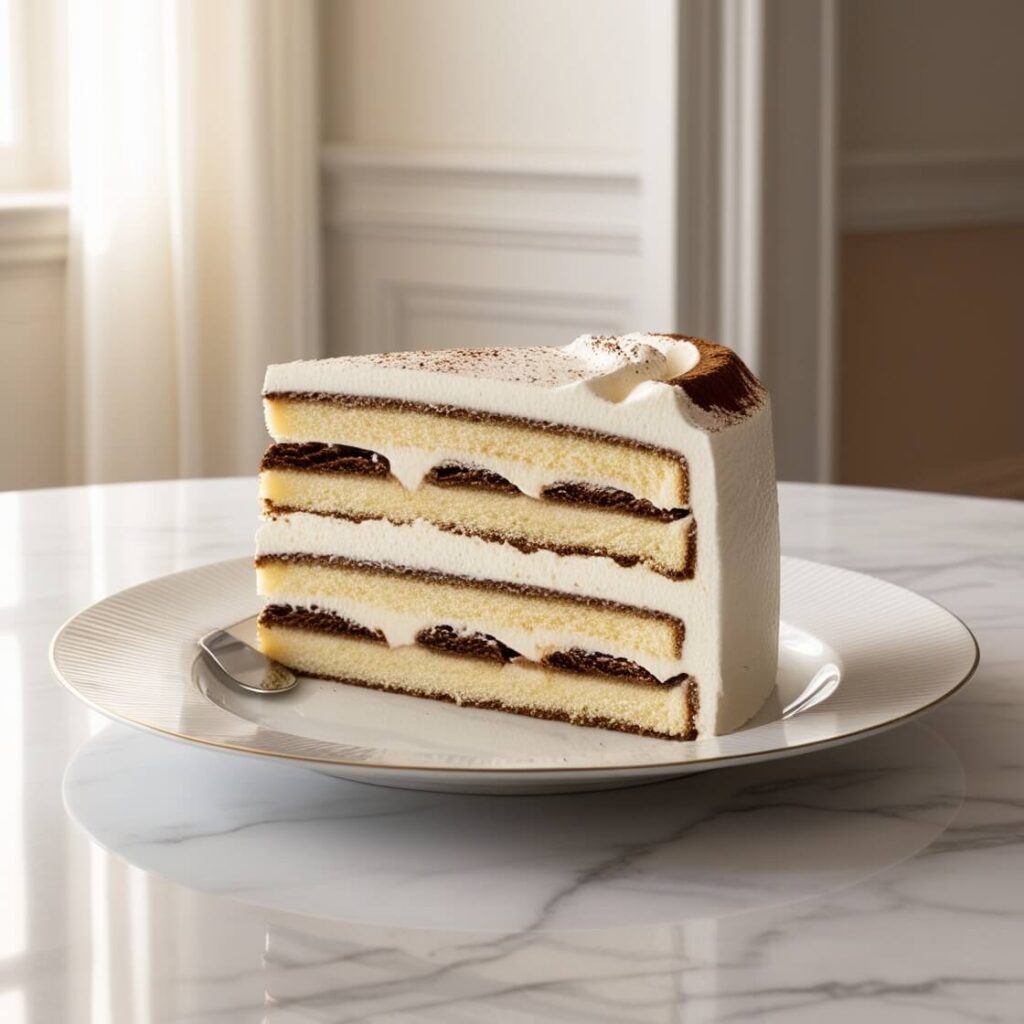
🔍 Chilled layers that melt in your mouth – the perfect summer tiramisu.
How Long to Chill for Best Texture
For tiramisu icebox cake to reach its ideal texture, proper chilling is non-negotiable. Most high-quality recipes recommend chilling for at least 8 hours. However, some sources suggest you can get away with as little as 4-6 hours. I’ve found the longer timeframe creates that perfect marriage of flavors and allows the cookies to fully soften into cake-like layers.
Chilling serves two critical purposes: setting the mascarpone mixture and softening the ladyfingers or cookies. The transformation happens as the cookies absorb moisture from the cream layers and coffee mixture, creating that signature melt-in-your-mouth consistency.
Can You Freeze It?
Yes, tiramisu icebox cake freezes surprisingly well! For best results, follow these guidelines:
- Wrap the cake carefully with a double layer of plastic wrap followed by aluminum foil
- Store in an airtight container if possible
- Freeze quickly by placing in the coldest part of your freezer
- Label with the date—frozen tiramisu maintains quality for up to 3 months
When ready to serve, thaw properly by transferring from freezer to refrigerator for 4-6 hours or overnight. Never thaw at room temperature due to the dairy components. For a professional touch, reserve the cocoa powder dusting until after thawing.
How Far in Advance Can You Make It?
This is where tiramisu icebox cake truly shines as a make-ahead dessert. According to multiple reliable sources, you can prepare it up to 2 days in advance [171]. In fact, many chefs believe the flavor improves with 1-2 days of refrigeration as ingredients meld together.
For optimal freshness without freezing, refrigerate your tiramisu icebox cake, covered lightly with plastic wrap, and consume within 2-3 days. Remember that if you’re adding the traditional cocoa powder dusting, it’s best to add this finishing touch just before serving [171].
Serving and Presentation Ideas
The final presentation of your tiramisu icebox cake transforms it from merely delicious to truly memorable. Once properly chilled, it’s time to focus on those finishing touches that will impress your guests.

🎯 A dreamy fusion of tiramisu and icebox cake in every bite!
Dusting with Cocoa or Chocolate Shavings
Traditionally, tiramisu icebox cake receives a generous dusting of unsweetened cocoa powder just before serving. This provides a beautiful contrast to the creamy layers beneath. For best results, use a small sifter to ensure even distribution across the top surface. This technique not only adds visual appeal but also introduces a slight bitterness that beautifully balances the sweetness of the dessert.
Alternatively, grated or shaved dark chocolate creates an elegant finish. Approximately 3 ounces of high-quality dark chocolate, carefully shaved with a vegetable peeler or microplane, provides both texture and flavor depth.
Adding Whipped Cream or Berries
For an extra special presentation, consider adding a final layer of freshly whipped cream right before serving. Additionally, fresh berries make stunning garnishes—strawberries and raspberries complement the flavors perfectly while adding vibrant color.
For a creative touch, try dusting with freeze-dried fruit powder instead of (or alongside) the traditional cocoa. This creates a visually striking “tie-dyed” effect when applied in different sections across the top.
Fresh mint leaves tucked among berries add a professional finishing touch and subtle aromatic element.
Cutting and Plating Tips
When serving from a springform pan, carefully remove the sides first, then peel away parchment paper. Subsequently, remove the bottom and plastic wrap before transferring to a serving platter using a large spatula or cake lifter.
For clean slices, dip your knife in hot water and wipe it dry between cuts. Serve immediately after slicing to maintain the perfect texture.
For casual gatherings, some prefer using a large serving spoon to scoop portions rather than slicing—this rustic approach embraces the dessert’s homemade charm while highlighting its luscious layers.
Conclusion
Tiramisu icebox cake certainly stands as an impressive yet approachable dessert that captures the essence of traditional tiramisu without any food safety concerns. Throughout this recipe, we’ve seen how quality ingredients like rich mascarpone cheese and properly soaked cookies create those distinctive layers that define this beloved Italian-inspired treat. Additionally, the straightforward assembly process makes this an achievable dessert for cooks of all skill levels.
Time remains your greatest ally when preparing this dessert. The minimum 8-hour chilling period transforms simple ingredients into something truly special as flavors meld and textures develop. This waiting period, though requiring patience, ultimately rewards you with that perfect creamy-yet-structured consistency that defines an excellent tiramisu.
Perhaps the most compelling advantage of this dessert lies in its make-ahead nature. You can prepare this showstopper up to 48 hours before your gathering, freeing you to focus on other aspects of entertaining. Likewise, the freezing option extends this flexibility even further, allowing you to plan weeks ahead for special occasions.
Last but not least, the presentation opportunities let you customize this classic to suit any occasion. Whether dusted with cocoa powder for traditional appeal or adorned with fresh berries for a summer gathering, this versatile dessert adapts to your needs while maintaining its essential character.
Your guests will undoubtedly appreciate both the familiar coffee-infused flavor profile and your thoughtful preparation of this food-safe version. The next time you need an impressive make-ahead dessert that serves a crowd, this tiramisu icebox cake deserves serious consideration. After all, few desserts combine such elegant presentation with practical preparation advantages so beautifully.
About HealthyBlog365
Welcome to HealthyBlog365, your go-to destination for all things food and drink. We believe that every meal is not just a way to nourish your body but also a meaningful connection with yourself and your loved ones.
HealthyBlog365 was created with a mission to inspire healthy living through nutritious meals and refreshing beverages. Here, you’ll discover a treasure trove of creative recipes, kitchen tips, and healthy eating trends tailored to fit modern lifestyles.
 What can you find on HealthyBlog365?
- Delicious and easy-to-make recipes: From simple meals for busy mornings to wholesome dinners for family gatherings, we’ve got you covered for every occasion.
- Nutritious drinks: Explore recipes for juices, smoothies, detox teas, and drinks that cleanse your body, boost your mood, and energize your day.
- Guides on eating habits: Get detailed insights into popular diets like keto, low-carb, and vegetarian-friendly meal plans.
- Kitchen hacks: Discover smart tips to save time, preserve food, and cook more efficiently.
We are committed to providing high-quality content, staying up-to-date with the latest trends, and maintaining a balance between nutrition and flavor.
 Connect with HealthyBlog365 on Social Media
Join the HealthyBlog365 community on social media platforms to stay updated with our latest posts, watch exciting tutorials, and share your food stories with us:
 Facebook: Follow us here to stay updated with our latest posts and join our community.
 Instagram: Check us out here for inspiring visuals and ideas.
 Pinterest: Pin with us here to save creative ideas you’ll love.
 YouTube: Subscribe here for detailed tutorials and exciting videos.
 Thank You for Supporting HealthyBlog365!
We aim to build a connected community where everyone can share and learn from each other. If you have any questions or suggestions, don’t hesitate to reach out to us via social media or our website.
We hope you have a wonderful time on HealthyBlog365 and find new inspiration for your healthy culinary journey!