Red velvet cookies recipe enthusiasts know that bakery versions can cost around $5 each, making homemade alternatives not only economical but also incredibly satisfying. Unlike many desserts, these cookies offer a unique hybrid texture between chewy cookies and tender cupcakes, creating an irresistible treat that’s hard to find elsewhere.
Additionally, our red velvet cookies recipe takes just 25 minutes from start to finish – only 15 minutes of prep and 10 minutes of baking time. These cookies feature the perfect balance of chocolate and vanilla flavors, complemented by a tangy cream cheese frosting that provides a delightful contrast to the cookie base. In fact, many bakeries report red velvet as their best-selling flavor in the US, and now you can create this popular treat at home without using cake mix shortcuts. What makes this recipe even better? The cookies are less sweet than specialty bakery versions, making them more enjoyable for those who prefer balanced flavors.
What Makes These Red Velvet Cookies Better Than Bakery?
Have you ever wondered why homemade cookies often taste better than store-bought ones? When it comes to these ruby-red treats, there are several qualities that make them superior to anything you’ll find in a glass display case. Let’s explore what makes these homemade red velvet cookies truly special.
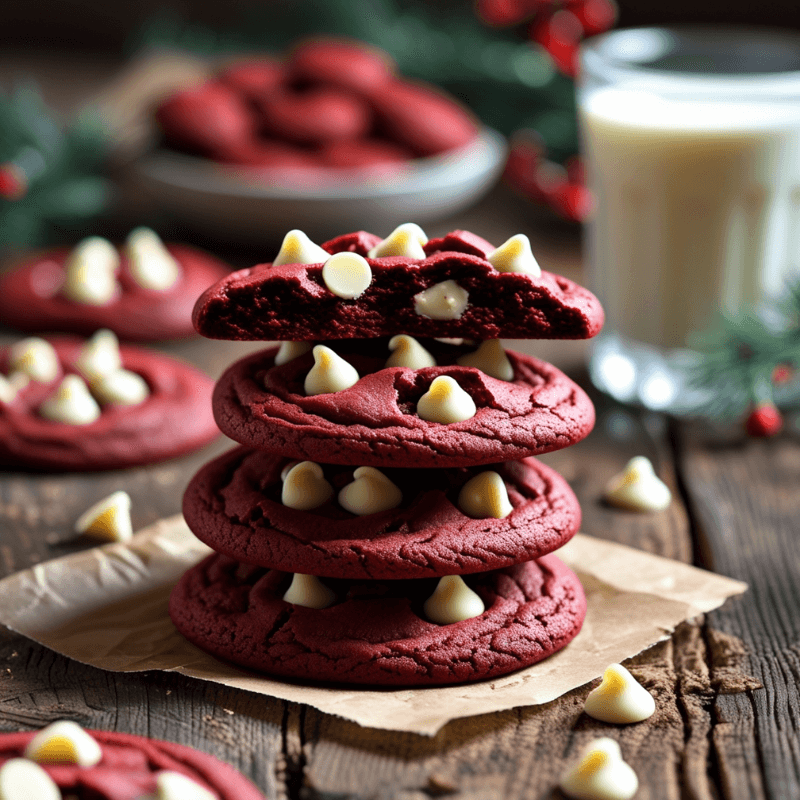
Red Velvet Cookies Recipe – Rich, soft, and delicious!
Perfect balance of chocolate and vanilla
The secret to exceptional red velvet cookies lies in their distinctive flavor profile. While many bakeries get this wrong, a proper red velvet cookies recipe strikes the perfect harmony between chocolate and vanilla. The cookies contain just enough cocoa powder (about 2 tablespoons) to provide a rich, chocolaty base without overwhelming the other flavors. This creates what one baker describes as “a cross between vanilla cake and chocolate cake”.
Moreover, using high-quality Dutch-processed cocoa powder gives these cookies a superior cocoa flavor. The hint of vanilla extract or vanilla bean paste adds another dimension that perfectly complements the cocoa undertones. Together, these elements create that classic red velvet taste—not too chocolaty, yet distinctly more complex than a plain sugar cookie.
Soft, chewy texture with a cakey center
Perhaps the most remarkable quality of these red velvet cookies is their perfect texture. Unlike many bakery cookies that are either too dry or too cakey, these homemade treats feature crispy edges with soft, chewy centers. The cookies have a delightful chew around the edges while maintaining a slightly fudgy center.
This ideal texture comes from several techniques. First, cream cheese replaces some butter in the dough, giving the cookies a subtle tang and soft bite that can’t be achieved with standard ingredients. Second, careful mixing prevents overdevelopment of gluten—mix only until ingredients combine to avoid tough cookies. Finally, slight underbaking ensures the cookies stay chewy for days.
Rich cream cheese frosting that complements the cookie
As one baker perfectly put it, “red velvet and cream cheese go together like pb+j”. The cream cheese frosting isn’t just a topping—it’s an essential component that elevates these cookies to gourmet status. The slight tanginess of the frosting perfectly balances the sweetness of the cookie base.
The frosting consists of creamed butter, cream cheese, powdered sugar, and vanilla, creating a silky smooth texture that pairs wonderfully with the cookie’s rich flavor. Don’t forget a pinch of salt in the frosting—it enhances all flavors and complements the sweetness.
Customizable for any occasion
Unlike bakery cookies that come in standard forms, your homemade red velvet cookies can be personalized for any event:
- Chip variations – While white chocolate chips create that classic red velvet look, you can substitute dark, milk, or semi-sweet chocolate for different flavor profiles
- Topping options – From crushed Oreos to sprinkles or pressed chocolate hearts for Valentine’s Day
- Frosting alternatives – Try dehydrated strawberry powder for naturally pink frosting or add cocoa powder for chocolate frosting
These cookies maintain their quality for up to a week when refrigerated, making them perfect for gifting during holidays and special occasions.
Essential Ingredients for the Perfect Red Velvet Cookies
The perfect red velvet cookies recipe starts with selecting the right ingredients. Creating this iconic dessert at home requires understanding the chemistry behind these specific components and how they interact to produce that signature flavor and color.
Why use gel food coloring?
Gel food coloring provides superior color intensity compared to liquid alternatives. Since too much liquid can negatively affect cookie spread and texture, gel coloring is the preferred choice. A mere ¾ teaspoon of gel coloring delivers the same vibrant red as a full tablespoon of liquid coloring. Consequently, your dough maintains its proper consistency without excess moisture. For those seeking natural alternatives, approximately 2 teaspoons of beet powder can create a beautiful burgundy hue.
The role of vinegar in red velvet cookies
Despite seeming unusual, vinegar serves a crucial purpose in red velvet recipes. This ingredient creates the signature tangy flavor and, more importantly, reacts with the baking soda to aerate the dough. Furthermore, vinegar activates the anthocyanin in cocoa powder, enhancing the vibrant red color. Always add the vinegar at the end of mixing to prevent premature reaction with baking soda—otherwise, you might end up with a “red velvet volcano” on your hands.
Choosing the right cocoa powder
Natural unsweetened cocoa powder is essential for authentic red velvet cookies. Unlike Dutch-processed varieties, natural cocoa maintains its acidity, which works with buttermilk and baking soda to create a tender crumb. Specifically, this acidity contributes to the unique color reaction that historically gave red velvet its name before artificial coloring became common. Natural cocoa powder likewise has a lighter color, making your red cookies more vibrant.
Importance of room temperature ingredients
Room temperature ingredients, especially butter, eggs, and cream cheese, ensure proper incorporation and optimal texture. Cold ingredients don’t cream properly with sugar, resulting in dense, uneven cookies. Essentially, allowing your refrigerated items to sit out for about 30 minutes before baking creates the perfect foundation for soft, chewy red velvet cookies with the ideal rise and texture.
Step-by-Step Guide to Making Red Velvet Cookies
Creating these stunning red velvet cookies is easier than you might think. With the right technique and careful attention to each step, you’ll achieve bakery-quality treats at home. Let me guide you through the process from start to finish.

Bake love with this Red Velvet Cookies Recipe!
1. Mix the dry ingredients
Initially, gather your flour, cocoa powder, baking soda, and salt. In a medium bowl, whisk these dry ingredients together thoroughly. This step ensures even distribution of leavening agents and prevents cocoa powder clumps in your finished cookies. Proper mixing at this stage creates a uniform color and texture throughout your cookies. Set this mixture aside while you prepare the wet ingredients.
2. Cream butter and sugars
The foundation of perfect red velvet cookies begins with properly creamed butter and sugar. Using room temperature butter, beat it together with both granulated and brown sugars until the mixture becomes light and fluffy. This typically takes about 2-3 minutes of mixing on medium speed. You’ll notice the color change as the mixture transforms from yellow to pale brown—a visual indicator that you’ve incorporated sufficient air for tender cookies.
3. Add wet ingredients and food coloring
Once your butter-sugar mixture is ready, add the egg and mix until well combined. Afterward, incorporate vanilla extract, which enhances the flavor profile of your cookies. Then add the vinegar (if your recipe calls for it) and red food coloring. Mix until you achieve a uniform red color throughout the dough. For best results, add the food coloring gradually to achieve your desired shade.
4. Combine and chill the dough
Now, slowly add your dry ingredient mixture to the wet ingredients. Mix on low speed just until combined—overmixing develops gluten, resulting in tough cookies. Fold in your chocolate chips (white chips provide beautiful contrast against the red dough). Prior to baking, many recipes recommend chilling the dough for at least 1 hour. This step prevents excessive spreading and intensifies flavor.
5. Scoop and bake the cookies
Preheat your oven to 350°F and line baking sheets with parchment paper or silicone mats. Scoop the dough into 1.5 tablespoon portions and roll into balls. For extra visual appeal, press additional chocolate chips onto the tops of the dough balls. Bake for 9-13 minutes until the edges appear set but centers remain slightly soft. Remember that cookies will continue firming up as they cool, so avoid overbaking.

Soft, chewy Red Velvet Cookies made easy!
How to Make and Apply the Cream Cheese Frosting
The cream cheese frosting is what truly transforms ordinary red velvet cookies into extraordinary treats. Let me walk you through creating this delectable topping that perfectly complements the rich cocoa undertones of your cookies.
Creaming butter and cream cheese
Firstly, ensure both your butter and cream cheese are softened to room temperature for smooth, lump-free mixing. In a stand mixer fitted with the paddle attachment (or using a hand mixer), beat the butter and cream cheese together for 1-2 minutes until the mixture becomes smooth and creamy. Importantly, avoid overmixing at this stage, as this can cause the frosting to break down and become runny.
Adding powdered sugar and vanilla
Next, gradually incorporate the powdered sugar into your cream cheese mixture. For a standard batch, you’ll need about 1¾ cups of confectioners’ sugar. Add the vanilla extract and a pinch of salt, then beat until the frosting becomes fluffy and well-combined. If your powdered sugar contains lumps, consider sifting it beforehand to prevent clogging when piping. To adjust consistency, you can add 1 teaspoon of milk if you prefer a thinner frosting.
Tips for piping or spreading frosting
Once your frosting is ready, wait until your red velvet cookies are completely cool before applying—frosting warm cookies will cause it to melt and slide off. For elegant presentation, transfer your frosting to a piping bag fitted with a round tip or a 1M piping tip for decorative swirls. Alternatively, you can simply spread the frosting with an offset spatula or butter knife for a more rustic look.
Decorating with cookie crumbs or sprinkles
For that professional finishing touch, consider decorating your frosted cookies with red velvet cookie crumbs. Simply crush a small cookie and sprinkle the crumbs over the frosting. Otherwise, add any sprinkles or decorations while the frosting is still wet so they adhere properly. Remember that frosted cookies can be frozen—just arrange them in a single layer in a freezer-safe container, separating layers with parchment paper.
Conclusion
After all, these red velvet cookies truly deserve their reputation as a bakery favorite. The perfect balance of chocolate and vanilla flavors, coupled with that distinctive soft-yet-chewy texture, makes them irresistible to cookie lovers everywhere. While bakery versions might cost you $5 each, our homemade recipe delivers superior results at a fraction of the cost.

Try this festive Red Velvet Cookies Recipe today!
The secret lies undoubtedly in the careful selection of ingredients and techniques we’ve explored. Gel food coloring provides vibrant color without excess moisture, while natural cocoa powder and vinegar create that signature red velvet chemistry. Furthermore, room temperature ingredients ensure the perfect texture every time.
Though the process might seem detailed, remember that these cookies require just 25 minutes from start to finish. The effort pays off when you bite into that first cookie—crispy edges giving way to a slightly fudgy center, all complemented by tangy cream cheese frosting.
You can certainly customize these treats for any occasion, from holiday gatherings to special gifts. Unlike bakery cookies with standardized offerings, your homemade version allows for endless variations in chips, toppings, and frosting styles. Most importantly, you’ll experience the satisfaction of creating something truly special that rivals—or even surpasses—anything you could purchase.
Therefore, the next time you crave that distinctive red velvet flavor, skip the bakery line and head to your kitchen instead. Your taste buds and wallet will thank you!
About HealthyBlog365
Welcome to HealthyBlog365, your go-to destination for all things food and drink. We believe that every meal is not just a way to nourish your body but also a meaningful connection with yourself and your loved ones.
HealthyBlog365 was created with a mission to inspire healthy living through nutritious meals and refreshing beverages. Here, you’ll discover a treasure trove of creative recipes, kitchen tips, and healthy eating trends tailored to fit modern lifestyles.
 What can you find on HealthyBlog365?
- Delicious and easy-to-make recipes: From simple meals for busy mornings to wholesome dinners for family gatherings, we’ve got you covered for every occasion.
- Nutritious drinks: Explore recipes for juices, smoothies, detox teas, and drinks that cleanse your body, boost your mood, and energize your day.
- Guides on eating habits: Get detailed insights into popular diets like keto, low-carb, and vegetarian-friendly meal plans.
- Kitchen hacks: Discover smart tips to save time, preserve food, and cook more efficiently.
We are committed to providing high-quality content, staying up-to-date with the latest trends, and maintaining a balance between nutrition and flavor.
 Connect with HealthyBlog365 on Social Media
Join the HealthyBlog365 community on social media platforms to stay updated with our latest posts, watch exciting tutorials, and share your food stories with us:
 Facebook: Follow us here to stay updated with our latest posts and join our community.
 Instagram: Check us out here for inspiring visuals and ideas.
 Pinterest: Pin with us here to save creative ideas you’ll love.
 YouTube: Subscribe here for detailed tutorials and exciting videos.
 Thank You for Supporting HealthyBlog365!
We aim to build a connected community where everyone can share and learn from each other. If you have any questions or suggestions, don’t hesitate to reach out to us via social media or our website.
We hope you have a wonderful time on HealthyBlog365 and find new inspiration for your healthy culinary journey!