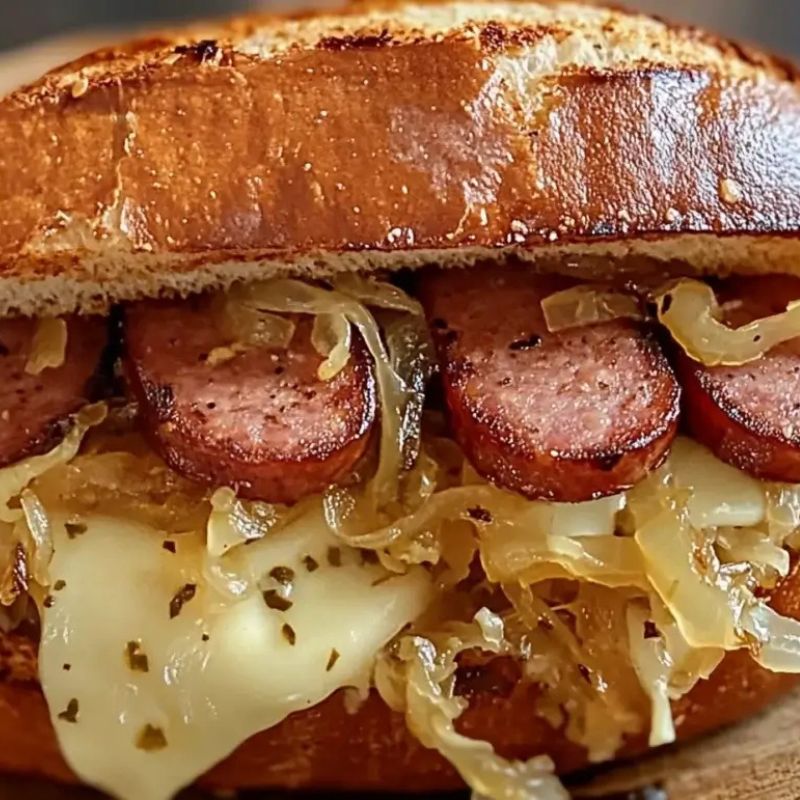
Grilled Kielbasa Sandwiches – The Ultimate Flavor-Packed Delight
There’s something about a hearty, melty, flavor-packed sandwich that just hits the spot. Whether you’re hosting a casual get-together or craving some serious comfort food, these Grilled Kielbasa Sandwiches check all the right boxes. They’re savory, tangy, slightly spicy, and packed with layers of incredible texture that make every bite satisfying.
Now, if you’re someone who loves the bold flavors of kielbasa, the tangy bite of sauerkraut, and the melty goodness of Gruyere cheese, you’re in for a treat. These Grilled Kielbasa Sandwiches bring all those flavors together in the most irresistible way. And the best part? They’re ridiculously easy to make!
What Makes Grilled Kielbasa Sandwiches Special?
Before we dive into the step-by-step instructions, let’s talk about why Grilled Kielbasa Sandwiches stand out:
✔ Smoky, Garlicky Kielbasa – This Polish sausage is rich in flavor and develops a perfect char when grilled.
✔ Tangy Sauerkraut – Adds a bright, acidic contrast that balances the richness of the kielbasa.
✔ Caramelized Onions – Brings a hint of sweetness that enhances the depth of flavors.
✔ Melty Gruyere Cheese – Creates a creamy, nutty finish that ties everything together.
✔ Mustard-Jalapeño Spread – A zingy kick of heat and tang that makes every bite unforgettable.
🔥 Ready to make the best Grilled Kielbasa Sandwiches ever? Let’s dive into the step-by-step recipe and take your sandwich game to the next level!
Easy Blackberry Balsamic Grilled Chicken Salad Recipe – Healthy & Delicious!
Ingredients You’ll Need for Grilled Kielbasa Sandwiches
Get ready to make flavor-packed Grilled Kielbasa Sandwiches with these simple ingredients:
✅ 4 hoagie rolls, sliced in half – The perfect vessel for all the delicious fillings.
✅ 1 lb kielbasa, sliced into rounds – Smoky, garlicky, and rich in flavor.
✅ 1 cup sauerkraut, drained – Adds the perfect tangy balance to the hearty kielbasa.
✅ 1 large onion, thinly sliced – Caramelizes beautifully for a touch of sweetness.
✅ 2 tbsp butter – Helps create golden, flavorful caramelized onions.
✅ 4 oz Gruyere cheese, sliced – Melts perfectly, adding a creamy and nutty touch.
✅ 2 tbsp Dijon mustard – Brings a sharp, tangy contrast to the savory sandwich.
✅ 1 small jalapeño, finely chopped – Adds a subtle kick of heat.
✅ 1 tbsp mayonnaise – Helps create a creamy mustard-jalapeño spread.
✅ 1 tbsp olive oil – Aids in caramelizing the onions and enhancing the flavors.
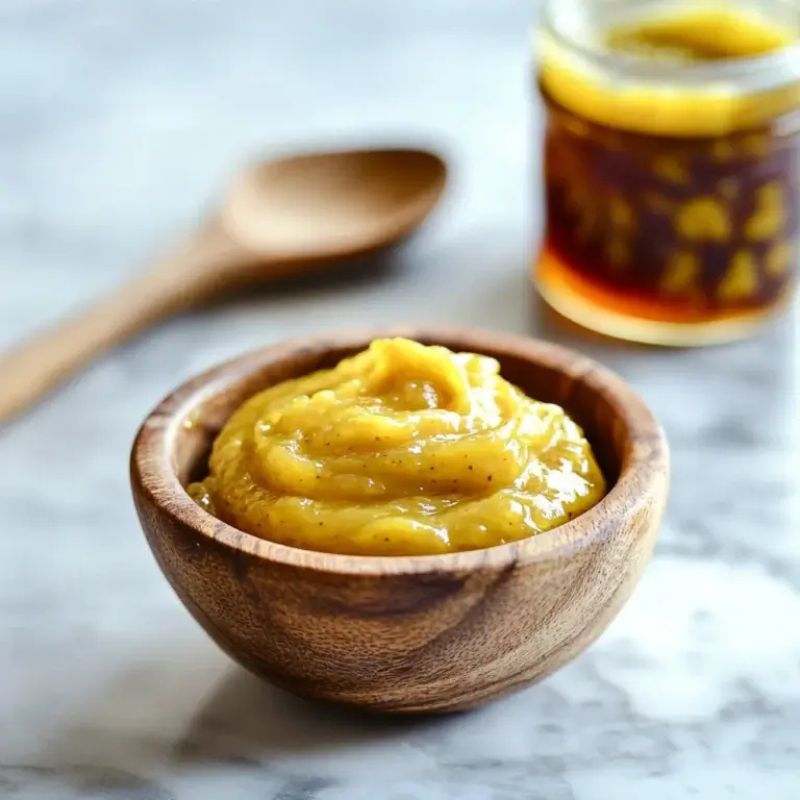
Step 1: Prepare the Mustard-Jalapeño Spread
This bold, tangy, and slightly spicy spread takes these sandwiches to the next level.
🥣 How to Make It:
1️⃣ In a small bowl, mix together Dijon mustard, finely chopped jalapeño, and mayonnaise until well combined.
2️⃣ Set aside for later—you’ll spread this onto the toasted hoagie rolls for an extra burst of heat and tang.
💡 Pro Tip: If you love extra heat, leave some jalapeño seeds in for a spicier kick!
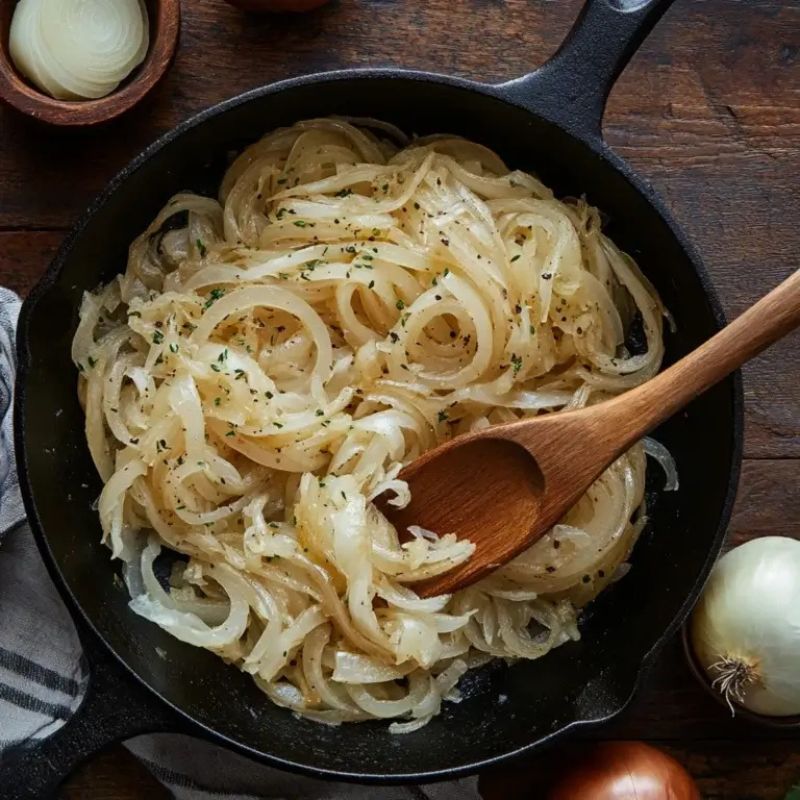
Step 2: Caramelize the Onions
Caramelized onions take a little patience, but trust me, they’re worth it! Their sweet, rich flavor perfectly complements the smoky kielbasa.
🔥 How to Caramelize Onions:
1️⃣ Heat butter and olive oil in a large skillet over medium-low heat.
2️⃣ Add the thinly sliced onions and stir occasionally.
3️⃣ Let them cook for 15-20 minutes until golden brown and sweet.
4️⃣ If they start to stick, add a splash of water or balsamic vinegar to deglaze the pan and enhance the flavor.
💡 Pro Tip: Low and slow is the key—don’t rush! The slower they cook, the sweeter they become.
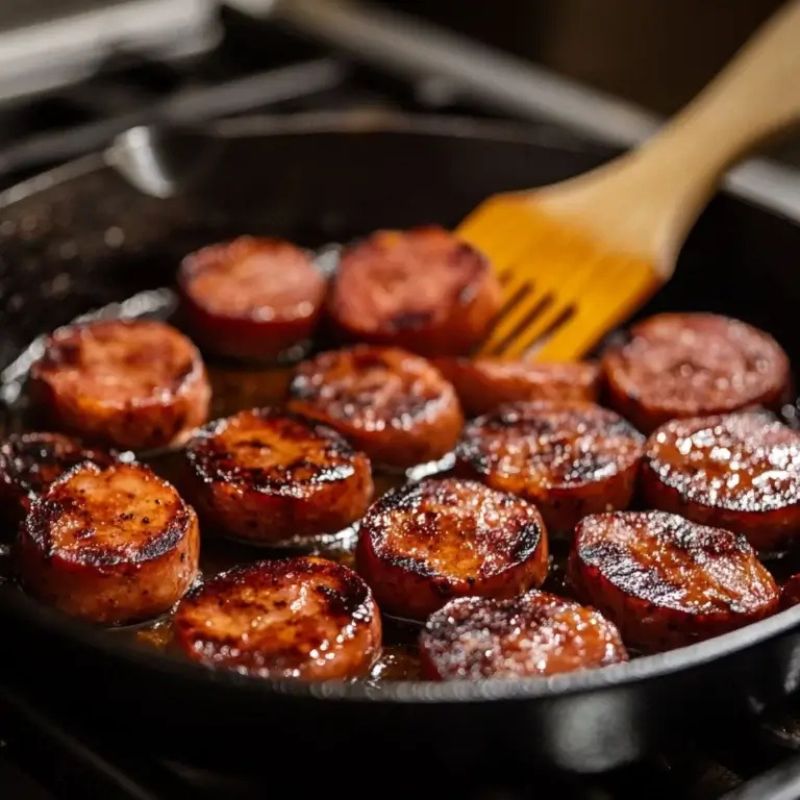
Step 3: Cook the Kielbasa
Now, let’s get that kielbasa crispy and flavorful!
🔥 How to Cook Kielbasa:
1️⃣ While the onions are caramelizing, heat a separate pan over medium heat.
2️⃣ Add the sliced kielbasa and cook for about 4-5 minutes per side, until they are browned and slightly crispy.
3️⃣ No extra oil is needed—the kielbasa releases enough fat to cook itself to perfection.
4️⃣ Once done, remove from the pan and set aside.
💡 Pro Tip: If you love a little extra char, grill the kielbasa instead for smokier flavor and grill marks!
Step 4: Toast the Rolls
A crispy, sturdy roll is essential for holding all the delicious fillings together without getting soggy.
🔥 How to Toast the Rolls:
1️⃣ Place the hoagie roll halves on a baking sheet, cut side up.
2️⃣ Lightly toast them under the broiler for 1-2 minutes until golden brown.
3️⃣ Watch them closely to avoid burning—just a light crisp is enough!
💡 Pro Tip: For extra flavor, brush the rolls with a little melted butter or olive oil before toasting.
Assembling the Ultimate Grilled Kielbasa Sandwiches
Now that everything is prepped, it’s time for the best part—building the sandwiches! Each layer adds a unique texture and flavor, so take your time and enjoy the process.
Step 5: Spread the Mustard-Jalapeño Mixture
Start with your toasted hoagie rolls, cut side facing up.
🥄 How to Do It:
✔ Take the mustard-jalapeño mixture you prepared earlier.
✔ Spread it generously on both sides of the toasted rolls.
✔ This tangy, slightly spicy spread enhances the smoky kielbasa and creamy cheese.
💡 Pro Tip: For an extra kick of heat, sprinkle a few red pepper flakes over the spread before layering the kielbasa!
Step 6: Layer the Kielbasa
Now it’s time to add the star of the sandwich—grilled kielbasa!
🍖 How to Layer It:
✔ Place 5-6 slices of browned kielbasa per sandwich, evenly spread.
✔ The smoky, juicy sausage should sit nicely atop the mustard spread.
💡 Pro Tip: If you prefer a meatier bite, you can double-layer the kielbasa slices for extra heartiness!
Step 7: Add the Sauerkraut
The tangy kick of sauerkraut balances the rich, savory kielbasa.
🥬 How to Add It:
✔ Drain the sauerkraut thoroughly to remove excess moisture.
✔ Layer it evenly over the kielbasa for a bold, acidic contrast.
✔ Love sauerkraut? Add more—it’s impossible to have too much tang!
💡 Pro Tip: For extra depth of flavor, sauté the sauerkraut for 2-3 minutes in a little butter before adding it to the sandwich!
Step 8: Add the Caramelized Onions
Time to layer on the sweet, golden caramelized onions we made earlier!
🧅 How to Add Them:
✔ Place a generous portion of onions over the sauerkraut.
✔ Their natural sweetness creates the perfect balance of savory, tangy, and sweet flavors.
✔ The onions will melt beautifully into the other ingredients when the cheese goes on top.
💡 Pro Tip: Love bold flavors? Add a few thin slices of raw red onion for extra crunch and sharpness!
Step 9: Top with Gruyere Cheese
Now for the magic ingredient—melty, nutty Gruyere cheese!
🧀 How to Layer It:
✔ Take two slices of Gruyere cheese and place them over the onions.
✔ This creamy, melty cheese wraps all the flavors together perfectly.
💡 Pro Tip: If you don’t have Gruyere, Swiss cheese, Havarti, or Provolone are great substitutes!
Step 10: Bake the Sandwiches
Now that your sandwiches are fully assembled, it’s time to melt the cheese and toast the rolls to perfection!
🔥 How to Bake Them:
1️⃣ Place the sandwiches back on the baking sheet.
2️⃣ Broil for 3-5 minutes until the cheese is melted, bubbly, and golden.
3️⃣ Keep a close eye on them to avoid burning!
💡 Pro Tip: Want extra crispy edges? Lightly brush the top of the rolls with butter or olive oil before broiling!
Step 11: Serve and Enjoy!
The moment you’ve been waiting for—time to dig in!
✔ Remove the sandwiches from the oven and let them cool for a minute or two.
✔ Slice them in half for easy serving.
✔ Serve immediately while the cheese is melty and the flavors are at their peak.
💡 Perfect Pairings:
🥤 Serve with crispy fries, potato chips, or a side of coleslaw for a complete meal.
🍺 Pair with a cold beer or a glass of iced tea for the ultimate experience!
Frequently Asked Questions (FAQ) – Grilled Kielbasa Sandwiches
Before you head off to make your Grilled Kielbasa Sandwiches, here are answers to some of the most common questions that might come up during preparation. These tips and tricks will help you troubleshoot, customize, and perfect your sandwiches for the best results!
1️⃣ Can I use a different type of sausage instead of kielbasa?
Absolutely! While kielbasa is the signature sausage for Grilled Kielbasa Sandwiches due to its smoky, garlicky flavor, you can easily swap it out for another option:
✔ Bratwurst – A milder, juicier choice that pairs well with sauerkraut.
✔ Italian Sausage – Adds a bit of spice and an herbaceous flavor.
✔ Andouille Sausage – A great Cajun-style alternative with extra smokiness.
✔ Chorizo – Perfect for those who love a bold, spicy kick.
💡 Pro Tip: Whatever sausage you choose for your Grilled Kielbasa Sandwiches, make sure it has a similar texture and bold flavor to complement the sauerkraut and Gruyere cheese.
2️⃣ Can I make Grilled Kielbasa Sandwiches ahead of time?
Yes! Grilled Kielbasa Sandwiches are great for meal prep and can be assembled ahead for a quick and easy meal.
🥪 How to Meal Prep These Sandwiches:
✔ Assemble your Grilled Kielbasa Sandwiches up to the point of baking.
✔ Cover them tightly with plastic wrap or foil and store them in the fridge for up to 24 hours.
✔ When ready to eat, broil for 3-5 minutes until the cheese is bubbly and golden.
💡 Pro Tip: Toast the hoagie rolls just before assembling to keep them crispy!
3️⃣ What if I don’t have Gruyere cheese?
No worries! If you don’t have Gruyere for your Grilled Kielbasa Sandwiches, here are some great cheese substitutes that still melt beautifully and complement the sausage’s flavor:
✔ Swiss Cheese – Very similar to Gruyere, with a nutty, slightly sweet flavor.
✔ Provolone – A mild, creamy option that melts well.
✔ Cheddar Cheese – Adds a sharper, more robust taste.
✔ Mozzarella – Offers a mild, gooey texture that won’t overpower the other flavors.
💡 Pro Tip: Love extra cheesy sandwiches? Try a blend of two cheeses to add depth of flavor!
4️⃣ Can I add other toppings to Grilled Kielbasa Sandwiches?
Absolutely! While the classic Grilled Kielbasa Sandwiches combination of kielbasa, sauerkraut, caramelized onions, and Gruyere is already packed with flavor, you can customize it with additional toppings:
✔ Pickles – Adds a tangy crunch.
✔ Fresh Herbs (Parsley, Dill, or Chives) – A pop of freshness.
✔ Spicy Mustard or Sriracha – For extra heat.
✔ Roasted Peppers – Brings a hint of sweetness and smokiness.
💡 Pro Tip: Since Grilled Kielbasa Sandwiches already have bold flavors, be mindful not to overwhelm them with too many toppings!
5️⃣ How do I store and reheat leftover Grilled Kielbasa Sandwiches?
If you have any leftovers (which is rare with Grilled Kielbasa Sandwiches!), here’s how to store and reheat them properly:
✔ Store – Wrap tightly in foil or an airtight container and refrigerate for up to 2 days.
✔ Reheat in the Oven – Preheat to 350°F (175°C) and bake for 10 minutes to keep the bread crispy.
✔ Reheat in a Skillet – Heat on low heat with a lid on until the cheese melts evenly.
🚫 Avoid microwaving – It will make the bread soggy instead of crispy!
6️⃣ Can I make Grilled Kielbasa Sandwiches vegetarian or vegan?
Yes! With a few ingredient swaps, you can enjoy a plant-based version of Grilled Kielbasa Sandwiches:
✔ Vegetarian Option – Swap the kielbasa for plant-based sausage or grilled portobello mushrooms for a meaty texture.
✔ Vegan Option – Use vegan cheese, dairy-free butter for caramelized onions, and plant-based mayo for the spread.
✔ Extra Protein – Add grilled tofu or tempeh as a hearty alternative.
💡 Pro Tip: Try smoked vegan sausages to mimic the traditional kielbasa flavor!
7️⃣ Can I Freeze Grilled Kielbasa Sandwiches?
Yes! While Grilled Kielbasa Sandwiches are best enjoyed fresh, you can freeze the assembled, unbaked sandwiches to enjoy later.
🧊 How to Freeze Kielbasa Sandwiches:
✔ Assemble your Grilled Kielbasa Sandwiches up to the point of baking.
✔ Wrap each sandwich tightly in plastic wrap, followed by a layer of aluminum foil to prevent freezer burn.
✔ Store in the freezer for up to 1 month.
🔥 How to Reheat Frozen Sandwiches:
✔ Thaw overnight in the fridge before baking.
✔ Bake as directed, adding a few extra minutes if needed until the cheese is melted and bubbly.
💡 Pro Tip: If the bread softens after freezing, toast the rolls separately before assembling for the best texture!
Conclusion: The Ultimate Grilled Kielbasa Sandwich Experience
And there you have it—everything you need to make these mouthwatering Grilled Kielbasa Sandwiches from start to finish! Whether you’re a fan of hearty, flavor-packed sandwiches or just looking for a unique twist on classic comfort food, this recipe is sure to become a new favorite in your kitchen.
Each bite is a perfect balance of flavors:
✔ Savory, smoky kielbasa with a crispy sear.
✔ Tangy, zesty sauerkraut to brighten up every bite.
✔ Sweet, caramelized onions for depth and richness.
✔ Creamy, melty Gruyere cheese that ties everything together.
✔ A bold mustard-jalapeño spread to add just the right amount of kick!
I hope this Grilled Kielbasa Sandwich recipe becomes a staple in your home. There’s something truly irresistible about the combination of charred sausage, gooey cheese, and toasted hoagie rolls—it’s the ultimate comfort food!
🔥 Tried this recipe? I’d love to hear how it turned out! Drop a comment below with your thoughts or any creative twists you added to make it your own. Enjoy every delicious bite! 🥪🔥
📌 About HealthyBlog365
Welcome to HealthyBlog365, your go-to destination for all things food and drink. We believe that every meal is not just a way to nourish your body but also a meaningful connection with yourself and your loved ones.
HealthyBlog365 was created with a mission to inspire healthy living through nutritious meals and refreshing beverages. Here, you’ll discover a treasure trove of creative recipes, kitchen tips, and healthy eating trends tailored to fit modern lifestyles.
💡 What can you find on HealthyBlog365?
- Delicious and easy-to-make recipes: From simple meals for busy mornings to wholesome dinners for family gatherings, we’ve got you covered for every occasion.
- Nutritious drinks: Explore recipes for juices, smoothies, detox teas, and drinks that cleanse your body, boost your mood, and energize your day.
- Guides on eating habits: Get detailed insights into popular diets like keto, low-carb, and vegetarian-friendly meal plans.
- Kitchen hacks: Discover smart tips to save time, preserve food, and cook more efficiently.
We are committed to providing high-quality content, staying up-to-date with the latest trends, and maintaining a balance between nutrition and flavor.
💻 Connect with HealthyBlog365 on Social Media
Join the HealthyBlog365 community on social media platforms to stay updated with our latest posts, watch exciting tutorials, and share your food stories with us:
- 📘 Facebook: Follow us here to stay updated with our latest posts and join our community.
- 📸 Instagram: Check us out here for inspiring visuals and ideas.
- 📌 Pinterest: Pin with us here to save creative ideas you’ll love.
- 🎥 YouTube: Subscribe here for detailed tutorials and exciting videos.
🌟 Thank You for Supporting HealthyBlog365!
We aim to build a connected community where everyone can share and learn from each other. If you have any questions or suggestions, don’t hesitate to reach out to us via social media or our website.
We hope you have a wonderful time on HealthyBlog365 and find new inspiration for your healthy culinary journe

Grilled Kielbasa Sandwiches
Description
Ingredients
- kielbasa sausages, sliced into rounds
- sweet onions, thinly sliced
- sauerkraut, drained
- Gruyere cheese, sliced
- crusty rolls
- grain mustard
- jalapeño jelly
Instructions
- In a small bowl, mix together the whole grain mustard and jalapeño jelly until well combined to create the zesty spread.
- Heat a cast iron skillet over medium heat and brown the kielbasa slices until slightly caramelized around the edges. Remove from the pan and set aside.
- Preheat the broiler.
- Using the same skillet, add the thinly sliced sweet onions and cook until they begin to soften and brown. Stir in the sauerkraut and cook together for about 8 minutes, allowing most of the juices to evaporate.
- Slice the crusty rolls and, if desired, scoop out a bit of the inside to create space for the fillings.
- Spread some of the mustard-jalapeño mixture on the bottom half of each roll. Layer on the seared kielbasa rounds, followed by the onion and sauerkraut mixture, then top with a slice of Gruyere cheese.
- Place the open-faced sandwiches under the broiler, along with the top halves of the rolls (cut-side up), until the cheese melts and the edges of the bread are slightly crisp.
- Remove from the oven and spread more of the mustard-jalapeño condiment on the top half of each roll. Close the sandwiches and serve immediately.