These Chicken Enchilada Roll Ups make perfect party appetizers that you can prepare quickly in 15 minutes. Each tortilla creates 10-12 bite-sized pieces, giving you about 80 tasty roll-ups for your guests. The best part? They pack authentic enchilada flavors at just 61 calories per piece, without the extra work of traditional recipes.
You can use rotisserie chicken or any pre-cooked chicken you have available. On top of that, it’s convenient to serve them cold or at room temperature, which makes them a great choice when hot food isn’t an option. Your guests will love these roll-ups paired with salsa, sour cream, or guacamole at your next gathering.
Let me show you how to create these delicious roll-ups in this piece. You’ll learn everything from ingredient selection to become skilled at the perfect slicing technique.
Essential Ingredients for Perfect Chicken Enchilada Roll Ups
Quality ingredients are the foundations of perfect Chicken Enchilada Roll Ups. These bite-sized treats need precise ingredient selection to achieve the perfect balance of flavors and textures, unlike traditional enchiladas. Let me show you everything that will make your roll ups the star of any gathering.
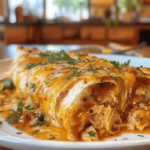
Packed with flavor and perfect for any party – these Chicken Enchilada Roll Ups are a hit!
Choosing the right tortillas
Your choice of tortillas can make or break these roll ups. Burrito-sized flour tortillas give you plenty of space to fill and roll. Traditional Mexican enchiladas use corn tortillas, but they often crack when rolled tightly. You’ll need to heat corn tortillas in hot oil or on a comal (flat iron griddle) to make them more flexible.
Whole wheat low-carb wraps offer a healthier option and stay intact longer. Some people like using flavored tortillas like spinach or southwest-style, which work best with milder fillings instead of heavily spiced ones.
Room temperature tortillas are vital – cold ones will crack during rolling. Warm them slightly before adding filling to get that perfect spiral.
Preparing flavorful shredded chicken
These roll ups are versatile, especially when you have chicken to work with. A rotisserie chicken offers the quickest way – just remove the skin, shred the meat, and you’re set. You’ll need about 3 cups of shredded chicken for a standard batch.
You can also cook boneless skinless chicken breasts yourself. The most tender results come from these methods:
- Poaching (takes about 15 minutes)
- Slow cooker shredding (4-6 hours on low)
- Stovetop sautéing (quickest method)
Many cooks season their chicken with cumin, oregano, garlic powder, and chili powder before cooking. Plain shredded chicken works great too since the filling contains taco seasoning.
Cream cheese mixture components
A few key ingredients create the creamy base that holds everything together. Two 8-ounce packages of softened cream cheese are the foundation. Softening matters – leave it at room temperature for an hour or use neufchatel cheese that’s naturally softer.
Mix in these ingredients:
- 1½ cups shredded Mexican cheese blend
- 2 tablespoons taco seasoning
- 1 teaspoon minced garlic
An electric mixer helps blend everything until smooth. This creates a creamy, flavorful base that carries all other ingredients. The taco seasoning gives that classic enchilada flavor without needing separate enchilada sauce.
Fresh additions that make a difference
The final components raise these roll ups from good to amazing. A well-drained 10-ounce can of diced tomatoes with green chilies (like Rotel) adds moisture and flavor without making soggy roll ups. Pico de gallo works too, but canned varieties help control moisture better.
Fresh herbs and vegetables bring brightness and texture:
- ½ cup chopped cilantro adds freshness
- 4 sliced green onions give mild onion flavor
- Optional chopped black olives provide briny depth
Spice lovers can add chopped pickled jalapeños or hot sauce. These roll ups adapt easily – adjust spice levels, garnish with avocado slices, or create vegetarian versions using black beans instead of chicken.
Gently fold these fresh ingredients into your cream cheese mixture instead of beating them in. This preserves their texture and keeps the filling from getting too watery.
Preparing Your Workspace and Ingredients
Proper preparation will give you stress-free Chicken Enchilada Roll Ups. A bit of planning and simple techniques help create perfect appetizers every time.
Creamy, cheesy, and rolled to perfection – Chicken Enchilada Roll Ups you’ll crave again and again!
Setting up a quick assembly station
A well-organized workspace makes all the difference with these bite-sized treats. Start by clearing a large, clean countertop where you can place multiple tortillas side by side. This assembly-line approach lets you make about 80 appetizers in just 15 minutes.
Set out your ingredients in order of use:
- Softened cream cheese mixture in a bowl
- Well-drained tomatoes in a separate container
- Room-temperature tortillas stacked and ready
- Plastic wrap pre-cut into sheets for wrapping
Keep a rubber spatula or offset knife close by to spread the filling evenly. A damp cloth helps clean your fingers between rolls and gives a neat presentation. These roll ups need to chill before serving, so clear some space in your refrigerator first.
These appetizers are great for parties because you can prepare them ahead and serve them cold or at room temperature. No last-minute cooking stress when you host gatherings.
Softening cream cheese properly
Soft cream cheese creates the foundation of these roll ups. Skip this step and you’ll end up with lumpy filling that won’t spread well. The cream cheese should feel soft to touch without melting.
You can soften cream cheese three ways:
- Traditional method: Leave cream cheese at room temperature for 1-3 hours. This never fails but needs planning ahead.
- Water bath method (15 minutes): Keep cream cheese in its foil packaging, place in a bowl, and cover with very warm water until soft. This gives the best quick results for perfect consistency.
- Microwave method (emergency option): Remove all packaging, cut cheese into cubes, and microwave in 15-second bursts, checking each time. Be very careful – cream cheese melts fast and overheated cheese won’t work in your filling.
Don’t worry if you forgot to soften your cream cheese. Cut it into small cubes to speed up softening or try the water bath method that works great without melting risks.
Draining tomatoes to prevent soggy roll ups
The most important prep step is draining your tomatoes well. Extra moisture ruins Chicken Enchilada Roll Ups and makes tortillas fall apart when sliced.
Put your diced tomatoes with green chilies in a fine-mesh strainer and press gently with a spoon’s back to remove liquid. Many sources stress draining “well”, showing how vital this step is. Fresh tomatoes don’t work well as they release too much liquid over time.
Pat the tomatoes dry with paper towels before mixing them into your cream cheese for best results. Your roll ups will keep their shape and texture up to 24 hours in the refrigerator.
Note that folding these drained tomatoes gently into your cream cheese mixture works better than beating them in. This keeps their texture intact and prevents watery filling. Good preparation like this means your Chicken Enchilada Roll Ups will be perfect when serving time comes.
Step-by-Step Rolling Technique
The rolling technique makes all the difference between good and great Chicken Enchilada Roll Ups once your ingredients are ready. You’ll get picture-perfect appetizers that keep their shape after slicing by mastering this process.
Spreading the filling evenly
Beautiful roll ups start with the right spreading technique. An offset spatula (like the ones used for frosting) helps create the smoothest, most even layer. The mixture should spread thinly and consistently right to the tortilla’s edges.
Your pinwheels won’t slice properly if the filling isn’t distributed well. Thick spots mixed with thin areas make the roll-ups fall apart when cut. Take time with each tortilla to spread the filling evenly across every corner.
The perfect amount of filling
These bite-sized treats turn out better with less filling than you might think. While stuffing them full seems tempting, holding back works better. Standard flour tortillas need about:
- ½ cup of filling per tortilla
- No more than 2 tablespoons of filling for smaller tortillas
Stuffing too much makes rolling hard and the filling spills everywhere. On top of that, it helps to give each tortilla similar amounts of filling for uniform roll-ups. This makes them look better and cook evenly if you heat them.
Rolling tightly without tearing
Start by putting your filling in the tortilla’s center. The next step brings one edge over and tucks it gently under the filling. This first fold sets up the whole roll.
Keep rolling with steady pressure, staying firm but not too tight. The roll-ups will come apart when cut if air gets trapped, so roll them as compact as possible. Finding the sweet spot between tight and gentle makes perfect rolls.
Try these fixes if your tortillas break while rolling:
- Let tortillas reach room temperature or warm them slightly
- Microwave corn tortillas with a light water spritz for 20 seconds
- A quick warm-up usually makes flour tortillas flexible enough
Securing the rolls for chilling
Place each finished roll with its seam facing down on the counter. This keeps the roll from unwinding. Multiple rolls should sit with their seams touching each other, which naturally helps keep their shape.
Wrap each roll tightly in plastic. This keeps them fresh and adds gentle pressure that helps set their shape during chilling.
Let the wrapped rolls chill at least 30 minutes before cutting. Better yet, leave them for 2 hours or overnight. This rest time lets the filling set up properly so you can cut clean slices.
Chilling and Slicing for Perfect Presentation
The secret to showstopping Chicken Enchilada Roll Ups comes down to two simple steps: proper chilling and precise slicing. These next steps will help you create appetizers that look professionally made after you master the rolling technique.
Why chilling matters
Your roll-ups need proper chilling to look perfect. The cream cheese mixture firms up in the refrigerator, which creates sturdy roll-ups that keep their shape when cut. Most recipes say you should chill for at least 30 minutes, but I’ve found longer chilling times work better.
The refrigerator helps your wrapped tortillas in several ways:
- The cream cheese becomes more solid
- The rolls slice more cleanly
- The filling stays in place during cutting
Some chefs recommend a quick freeze for super clean cuts. You might feel tempted to skip the chilling step when guests are coming, but I learned this lesson the hard way. My rushed attempts led to squished, messy pieces instead of beautiful pinwheels.
Using the right knife for clean cuts
Your knife choice can make or break the presentation of these appetizers. A sharp serrated knife works best for this job. The serrated edge lets you saw gently instead of pushing down, which keeps the rolls from squishing.
The best cuts happen when you find natural separation points and slice precisely. Large knives often cause problems with these roll-ups. Medium-sized utility knives (around 5.5 inches) give you better control and precision than larger chef’s knives.
Clean your knife between cuts to get the prettiest slices. The perfect two-bite appetizer portions come from cutting segments about 1 to 1½ inches thick.
Troubleshooting common cutting problems
Problems can pop up even with proper chilling. Soft filling might make your roll-ups squish during cutting – just pop them back in the refrigerator or freeze them briefly.
Here’s how to fix uneven, jagged pieces:
- Check if your knife needs sharpening
- Use gentle sawing motions instead of pressing down
- Chill the rolls seam-side down against each other to prevent unrolling
You should get about 8 pieces from each tortilla. These appetizers look great on a serving platter and stay firm at room temperature, which makes them perfect for parties.
Variations and Customizations
These Chicken Enchilada Roll Ups are amazing because you can adapt them to any diet or taste. You can customize these appetizers in so many ways and still keep that authentic enchilada flavor.
Spice level adjustments
You can easily change how spicy your roll ups are. Want them milder? Just cut back on chipotle peppers and stick to mild salsa, taco seasoning, green chilies, and enchilada sauce. Heat lovers can throw in fresh jalapeños, add more cayenne pepper, or use spicier green chilies.
Your guests should guide your spice choices. Family events with kids might need a milder touch, while adult parties can handle more heat. You can always add hot sauce gradually or serve it on the side for dipping.
Vegetarian options
Making these meatless is super easy. You can swap the shredded chicken with:
- Drained black beans (mash them a bit for better texture)
- Sautéed mushrooms and spinach
- Roasted bell peppers and zucchini
The texture is different from chicken, but these veggie versions taste just as good. Extra spices help make up for chicken’s flavor naturally.
Gluten-free adaptations
Corn tortillas work great for people with gluten sensitivities, though they’re smaller and not as flexible. You’ll want to heat them really well before rolling so they don’t crack. Make sure your enchilada sauce is gluten-free too – most store brands use flour to thicken.
Low-fat alternatives
You can make these roll ups lighter without losing their delicious taste. Try neufchâtel cheese instead of regular cream cheese – it has 1/3 less fat. Greek yogurt can take the place of some cream cheese, adding protein and cutting fat. Using less shredded cheese or switching to part-skim varieties reduces calories while keeping that cheesy goodness.
These changes might mean your roll ups need extra time in the fridge to set properly.
Conclusion
Chicken Enchilada Roll Ups make perfect party appetizers that blend convenience with crowd-pleasing flavors. Anyone can create these delicious bite-sized treats with the right ingredients, proper preparation, and skilled rolling and slicing techniques.
These tasty roll ups work great for different dietary needs and taste priorities. They maintain their appealing presentation at room temperature or chilled while delivering authentic enchilada flavors in a simpler way than traditional recipes.
The secret to success lies in the details. Softened cream cheese, properly drained tomatoes, and enough chilling time create the difference. My experience with countless batches proves that these steps consistently produce picture-perfect appetizers.
A small initial batch helps you refine your technique before scaling up for larger gatherings. Once you’re comfortable with the simple version, try different fillings and spice levels. You’ll soon develop your signature version that guests will request at every party.
 About HealthyBlog365
Welcome to HealthyBlog365, your go-to destination for all things food and drink. We believe that every meal is not just a way to nourish your body but also a meaningful connection with yourself and your loved ones.
HealthyBlog365 was created with a mission to inspire healthy living through nutritious meals and refreshing beverages. Here, you’ll discover a treasure trove of creative recipes, kitchen tips, and healthy eating trends tailored to fit modern lifestyles.
 What can you find on HealthyBlog365?
- Delicious and easy-to-make recipes: From simple meals for busy mornings to wholesome dinners for family gatherings, we’ve got you covered for every occasion.
- Nutritious drinks: Explore recipes for juices, smoothies, detox teas, and drinks that cleanse your body, boost your mood, and energize your day.
- Guides on eating habits: Get detailed insights into popular diets like keto, low-carb, and vegetarian-friendly meal plans.
- Kitchen hacks: Discover smart tips to save time, preserve food, and cook more efficiently.
We are committed to providing high-quality content, staying up-to-date with the latest trends, and maintaining a balance between nutrition and flavor.
 Connect with HealthyBlog365 on Social Media
Join the HealthyBlog365 community on social media platforms to stay updated with our latest posts, watch exciting tutorials, and share your food stories with us:
 Facebook: Follow us here to stay updated with our latest posts and join our community.
 Instagram: Check us out here for inspiring visuals and ideas.
- Pinterest: Pin with us here to save creative ideas you’ll love.
 YouTube: Subscribe here for detailed tutorials and exciting videos.
 Thank You for Supporting HealthyBlog365!
We aim to build a connected community where everyone can share and learn from each other. If you have any questions or suggestions, don’t hesitate to reach out to us via social media or our website.
We hope you have a wonderful time on HealthyBlog365 and find new inspiration for your healthy culinary journey!
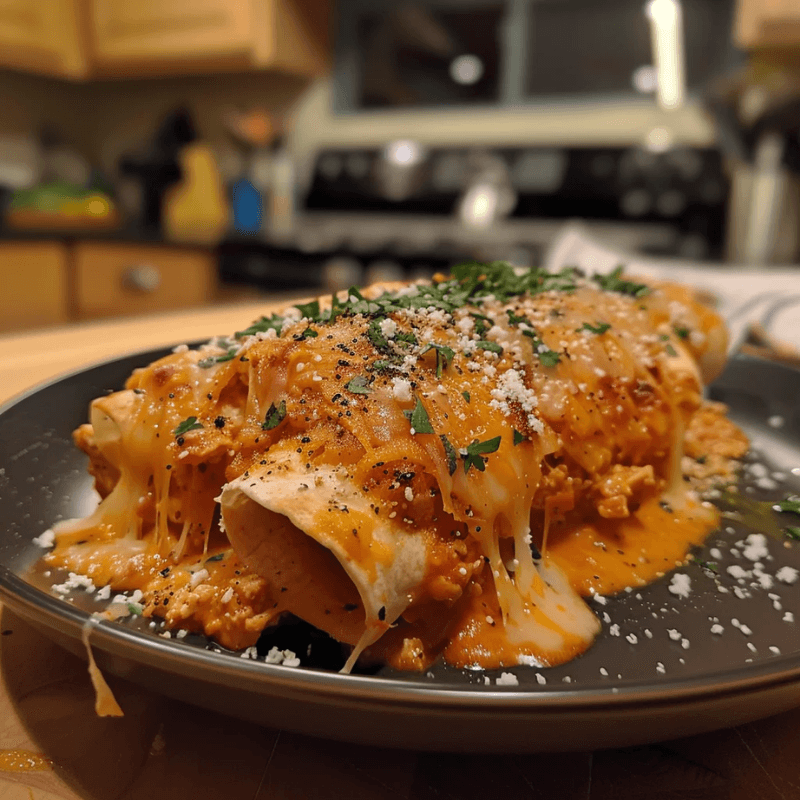
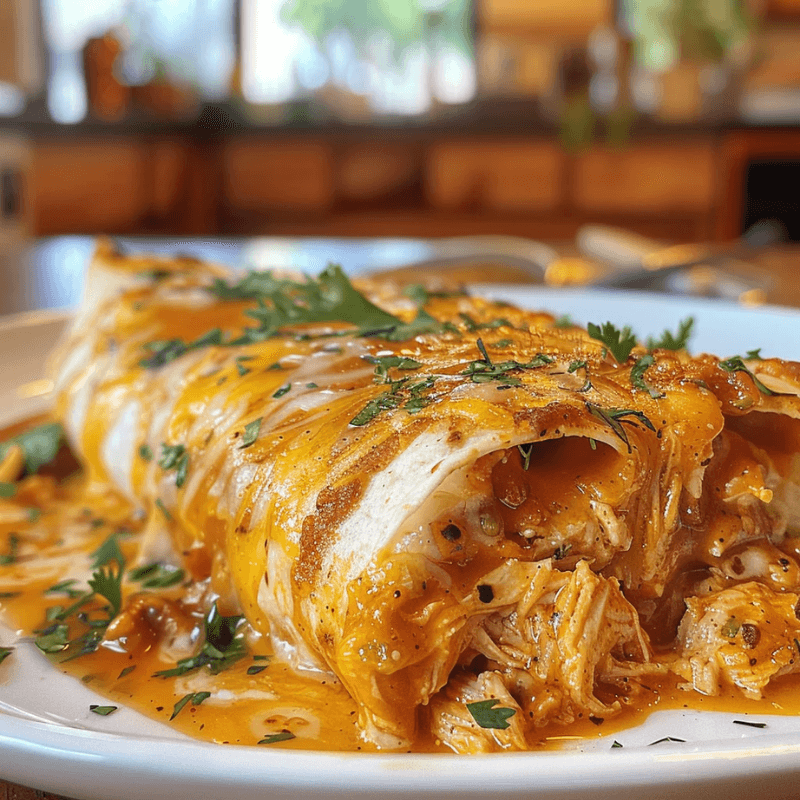
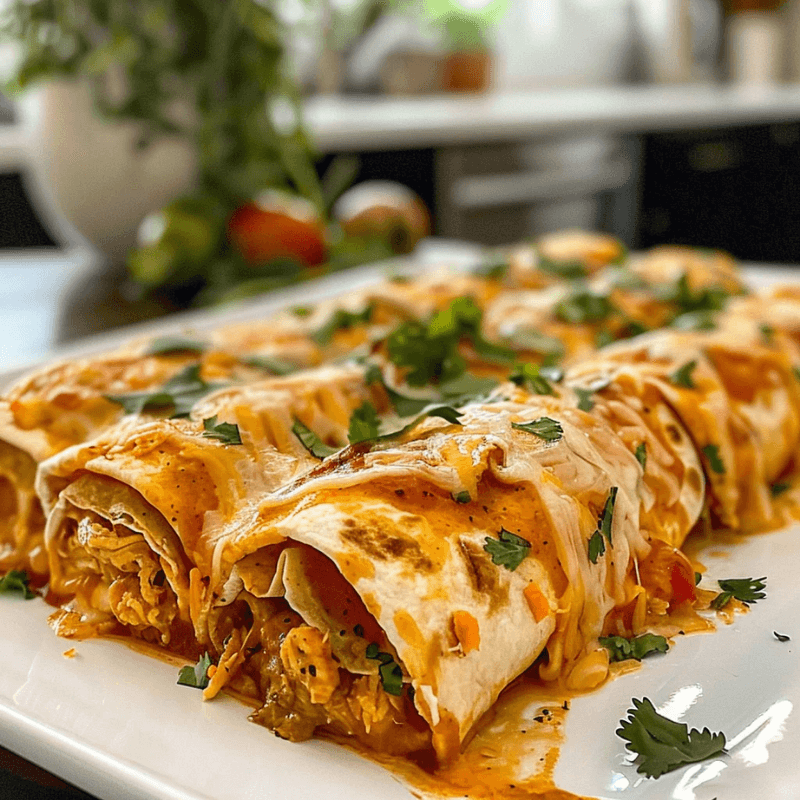
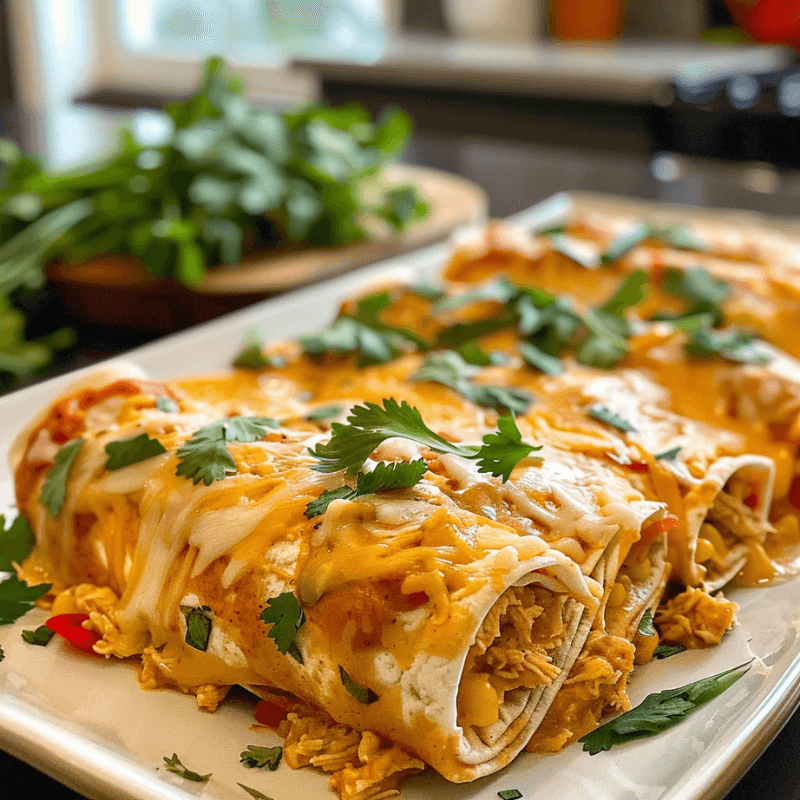
Chicken Enchilada Roll Ups
 Prep Time 15 minutes Cook Time 25 minutes Total Time 40 minutes
 Description
Ingredients
- 3 –4 boneless skinless chicken breasts (about 1 lb)
- 8 flour tortillas
- 2 cups shredded cheese Cheddar and Monterey Jack blend
- 1 cup enchilada sauce store-bought or homemade
- ½ cup sour cream
- ¼ cup fresh cilantro optional
- 2 tsp olive oil
- 2 cloves garlic minced
- 1 tsp cumin
- 1 tsp chili powder
- Salt and pepper to taste
Instructions
- Preheat the oven to 350°F (175°C) and prepare a baking dish with nonstick spray.
- In a skillet over medium heat, heat olive oil and sauté minced garlic until fragrant. Add chicken breasts seasoned with salt and pepper, cooking until golden brown (about 7-10 minutes).
- Remove cooked chicken from heat, let cool slightly, then shred using two forks.
- Warm tortillas in a dry skillet or microwave until pliable. Lay flat for assembly.
- Spread shredded chicken on each tortilla, drizzle with enchilada sauce, sprinkle cheese generously, then roll tightly from one end to another.
- Place rolled tortillas seam-side down in the baking dish. Pour remaining enchilada sauce over them and top with more cheese. Bake uncovered for 20-25 minutes until bubbly and golden brown.