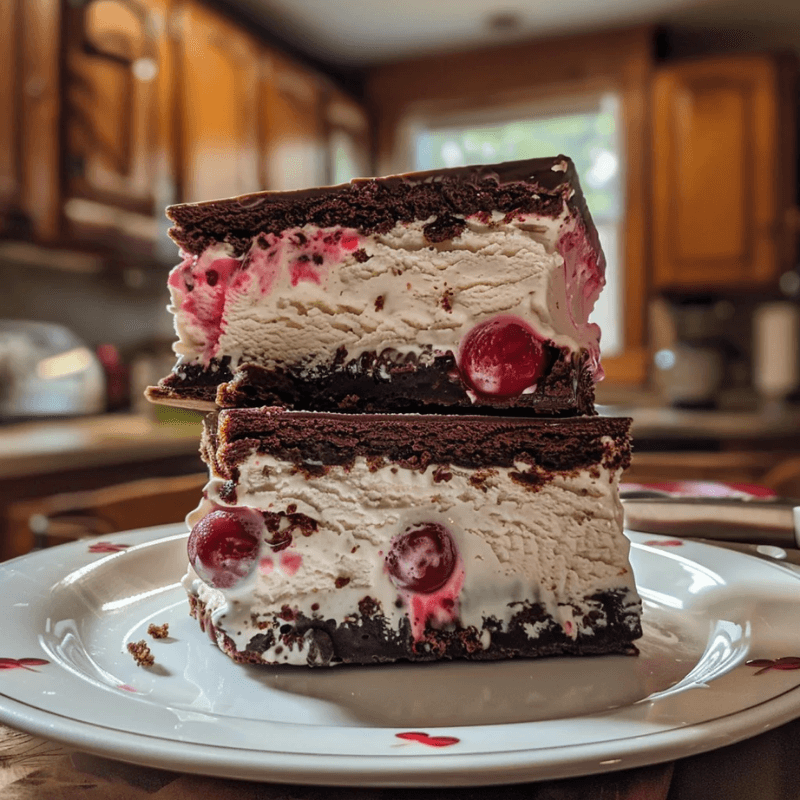
Sweet cherry jam and creamy vanilla ice cream nestle between soft, fudgy brownies that maintain their perfect tenderness even frozen. This decadent dessert needs about 5 hours to prepare, with 4 hours dedicated to freezing time. The wait proves worthwhile with every delicious bite.
These impressive treats serve 8 people and last up to 2 weeks in the freezer, which makes them ideal for planned gatherings. The magic comes from a special brownie recipe that stays wonderfully soft at freezing temperatures. Proper ice cream consistency and cherry preparation techniques play crucial roles too. Let me walk you through each step to create these crowd-pleasing dessert sandwiches, from cherry selection to final assembly.
The Science Behind Perfect Brownie Texture for Freezing
The success of Cherry Brownie Ice Cream Sandwiches relies on brownies that don’t become tooth-breaking rocks in the freezer. The science behind brownie texture helps us create the perfect frozen treat foundation.
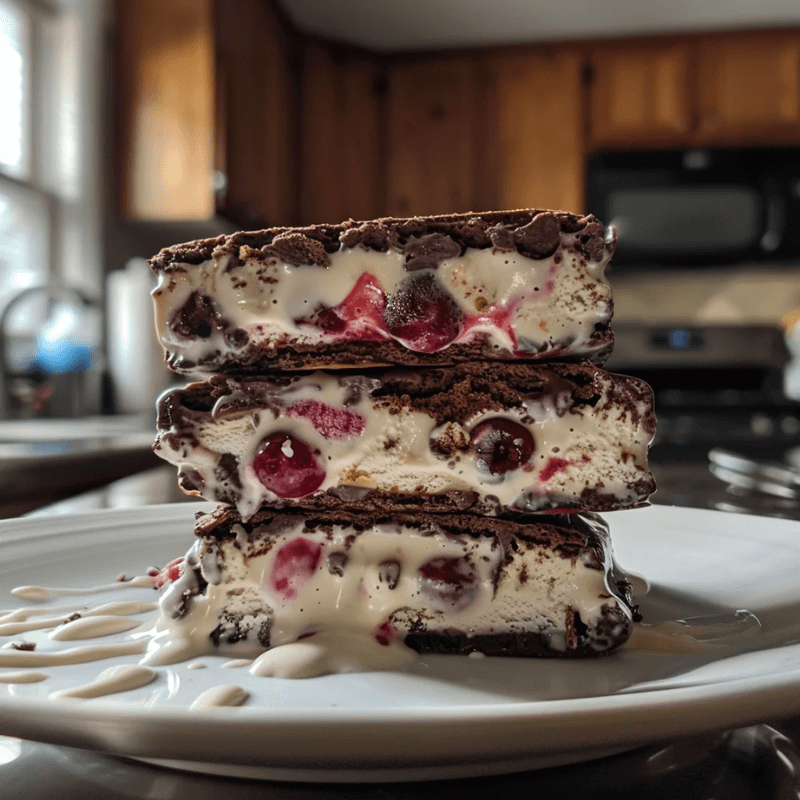
Fudgy brownies, creamy cherry ice cream – these Cherry Brownie Ice Cream Sandwiches are a frozen dream!
Why regular brownies become rock-hard in the freezer
Standard brownie recipes often turn impossibly hard when frozen because of their composition. This happens as fats substantially solidify at freezer temperatures. A brownie that’s perfectly chewy at room temperature turns into something much denser and firmer once chilled. The cold temperature makes the butter harden completely and removes the creamy mouthfeel that makes brownies enjoyable. The lack of moisture retention causes ice crystallization, which creates that dreaded rock-hard texture.
A chef points out that “A brownie stored in the fridge will be denser than one that’s been heated up just slightly before serving”. The freezer makes this effect even more noticeable. You need to create brownies specifically designed to withstand freezing.
The ideal fat-to-flour ratio for frozen brownies
Tender frozen brownies depend on the right fat-to-flour ratio. Fudgy brownies naturally contain more fat-to-flour proportion, which makes them perfect for freezing. Pastry experts say that “Fudgy brownies have a higher fat-to-flour ratio, making them denser and moister”.
To make freeze-friendly brownies:
- Add more butter and chocolate (fat sources)
- Use less flour
- Add eggs for their lecithin (an emulsifier that helps fats and moisture stay mixed)
A successful brownie ice cream sandwich recipe developer noted they “added butter to make up for the loss of liquid chocolate and added baking powder to give the brownies a little lift and extra softness”. Slightly under-baked brownies won’t turn break-your-teeth hard in the freezer.
How sugar types affect freezing properties
Sugar does more than add sweetness—it substantially changes how brownies freeze. Sugar’s hygroscopic nature attracts and holds water molecules, which helps brownies stay moist even when frozen.
Different sugar types freeze differently:
- Granulated sugar gives you the classic crackly brownie top and simple moisture retention
- Brown sugar’s molasses content adds extra moisture, making softer frozen brownies
- Granulated and dark brown sugar together create “the ideal chewy fudge brownie texture” that stays good during freezing
Baking science tells us that “Sugar tenderizes baked goods because it interferes with the coagulation of proteins, including the gluten network”. This interference helps brownies meant for the freezer by preventing them from getting too rigid when cold.
Testing different brownie recipes for freezer success
Bakers have found that traditional brownie recipes need changes to work in the freezer. Here’s what they learned:
- Timing matters: Brownies get harder to cut after 18 hours in the freezer, so plan your assembly timeline carefully.
- Ingredient adjustments: The best frozen brownie recipes include:
- Extra butter to make up for freezer solidification
- Less flour to reduce rigid structure
- Baking powder for tenderness
- The right sugar balance for moisture
- Baking technique: Brownies baked for less time (about 18 minutes for a standard recipe) won’t over-set. Experts say fudgy brownies are ready “when the edges start pulling away from the pan’s sides, and a toothpick inserted in the center comes out with a few moist crumbs”.
You can freeze brownies for up to 3 months without losing quality if you make them the right way. The goal is to create brownies that stay fudgy and chewy even at freezer temperatures, giving your Cherry Brownie Ice Cream Sandwiches the perfect texture base.
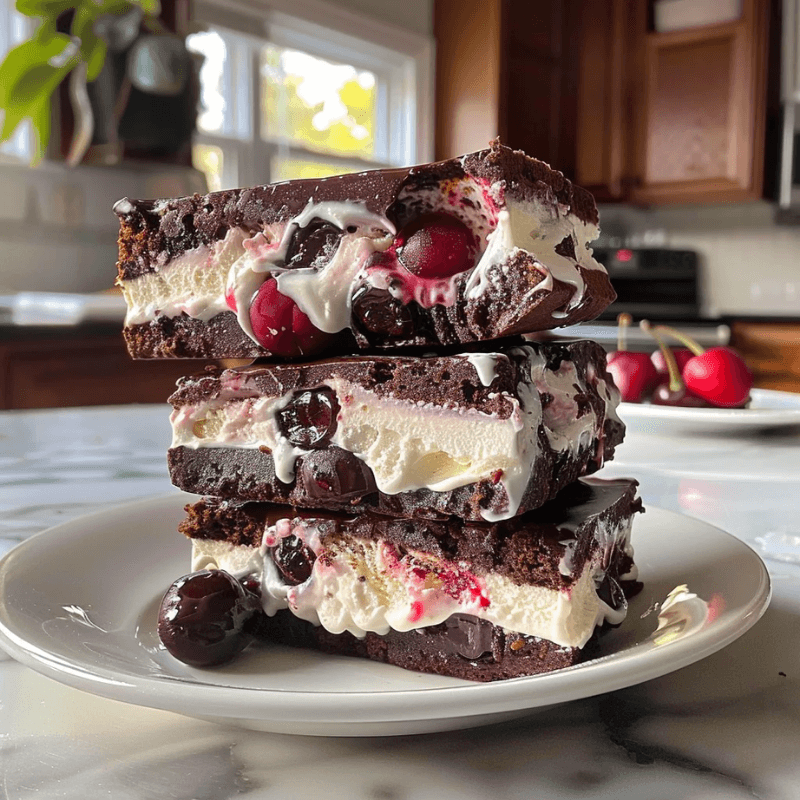
Selecting and Preparing Cherries for Maximum Flavor
The secret to amazing Cherry Brownie Ice Cream Sandwiches lies in how you choose and prepare your cherries. Let’s look at ways to get that perfect mix of flavor and texture.
Rich, chewy, and bursting with cherry flavor – your new favorite summer treat!
Fresh vs. frozen vs. preserved cherries
You need to know your cherry options before getting started. Fresh cherries taste amazing but come with some limits.
“Cherry season doesn’t last forever so now is the time to live our best cherry life,” notes one pastry chef. You’ll find fresh cherries from April through August, though peak season changes by region.
Frozen cherries make a great backup plan. “I used fresh dark red cherries, but frozen will work perfectly as well,” confirms one recipe developer. These cherries keep their flavor and you can get them any time of year. Just watch out for extra moisture when you use them.
Preserved cherries often work better than fresh or frozen ones if you want reliable results. A complete testing of cherry products for baking found “jarred Morello cherries from Trader Joe’s” came out on top with their “deep ruby red color, tart flavor, and plump and meaty texture”. The light syrup these cherries come in helps boost their flavor, unlike water-packed ones that can taste bland.
Creating a balanced cherry compote
A good cherry compote gives you rich flavor and just the right moisture for ice cream sandwiches. Here’s what you need:
- Cherries (fresh, frozen, or preserved)
- Sugar (about 3 tablespoons for 2 cups of cherries)
- Thickener (cornstarch mixed with water works best)
- Flavor boosters (almond extract, lemon zest, or juice)
Here’s how to cook it: “Add the cherries, sugar, and almond extract to a pot over medium heat. Cook, stirring, until it reaches a low boil, then reduce heat to low. Cook, stirring occasionally, for 8 minutes”. Then add your cornstarch mixture to thicken it up.
You can also “place the covered bowl in the refrigerator overnight” if you want to prep ahead. This works great for ice cream sandwiches and lets the flavors develop fully.
Macerating techniques for flavor enhancement
Macerating helps you get the most flavor from your cherries. “Macerating will slightly soften your cherries and pull out some of their natural juices. This step is important to make a presentable pie slice”. This same idea makes your ice cream sandwiches taste better too.
The steps are simple: “Toss your pitted cherries in a bowl with sugar. Cover and set aside for 30 minutes to allow the cherries to macerate”. Some bakers let their cherries sit overnight in the fridge for deeper flavor.
You can try some fancy macerating tricks too. One recipe suggests “placing cherries, balsamic vinegar, and sugar in a bowl and stir well to combine. Set aside for at least 1 hour”. Another adds “1/4 cup of brandy” for an elegant touch.
Controlling moisture to prevent ice crystals
Your Cherry Brownie Ice Cream Sandwiches need good moisture control to avoid ice crystals. Too much water from cherries can make them feel grainy when frozen.
“For best results, quick freeze at -10°F and serve just as ice crystals are disappearing”. The right freezer temperature keeps large ice crystals from forming and breaking down the cherry texture.
Sugar does more than just sweeten things up: “The sugar also serves an important chemistry function by drawing out some of the water from the cherry flesh, preventing it from becoming too icy during freezing”. This helps your ice cream stay smooth.
Frozen cherries need extra attention: “You’ll need to drain them well and/or add extra thickener as frozen items hold onto their liquid really well”. A quick cook can help too: “For a smooth texture, you have to purée cooked cherries and combine with whipped cream”.
After you put everything together, “Cover the ice cream with clingfilm or parchment paper, pressing it directly onto the surface of the ice cream to prevent ice crystals from forming”. This simple step keeps your cherry creation tasting great even after freezing.
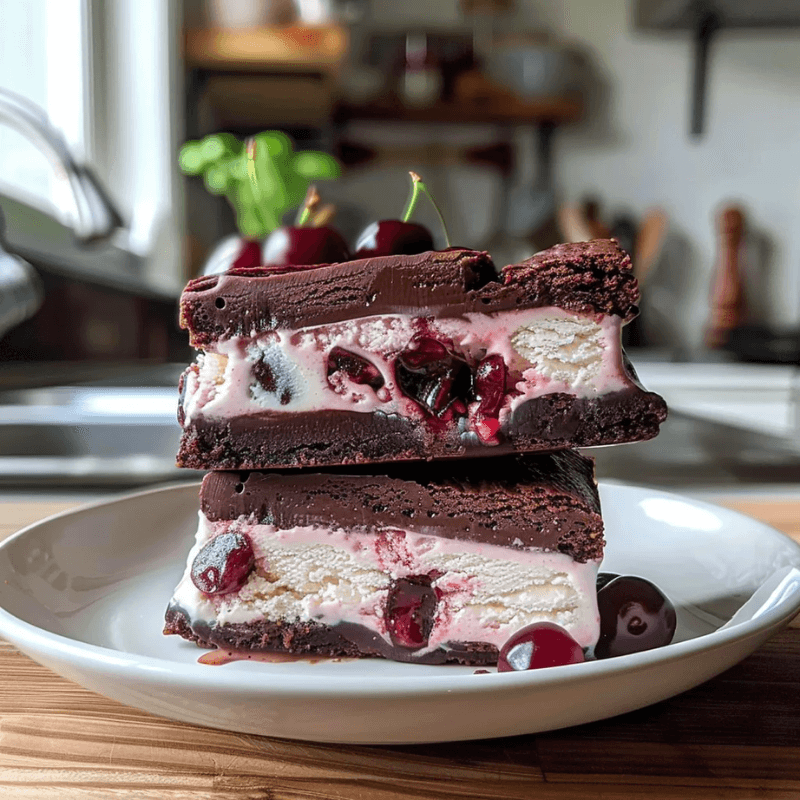
Mastering the Ice Cream Component
Ice cream stands as the cool centerpiece of Cherry Brownie Ice Cream Sandwiches. The perfect frozen treat depends on the right type, texture, and temperature.
Brownies + cherries + ice cream = the ultimate sandwich combo you didn’t know you needed!
Store-bought vs. homemade ice cream considerations
Quality makes a substantial difference in choosing ice cream for sandwiches. Most store-bought varieties have “gums and stabilizers” that create a “gummy or fluffy” texture with minimal dairy flavor. Premium commercial ice creams with “milk, cream, and buttercream” ingredients come close to “practically homemade quality”.
You get better control over ingredients with homemade ice cream, but challenges exist. Standard homemade no-churn ice cream won’t work because it’s “too soft” for ice cream sandwiches. Both store-bought and homemade options serve well, but they need proper softening before assembly.
No-churn cherry vanilla ice cream recipe
This delicious no-churn cherry vanilla ice cream needs just basic equipment:
- 3½ cups frozen sweet cherries
- 2 cups cold whipping cream
- 1 can sweetened condensed milk
- 1 tablespoon vanilla extract
Start by pureeing 3 cups of cherries in a blender. Mix sweetened condensed milk and vanilla in a bowl. Whip the cream in a separate cold bowl until stiff peaks form. Add the sweetened condensed milk mixture by folding, gently mix in the cherry puree, then transfer to a loaf pan. Place remaining whole cherries on top and press wax paper against the surface before freezing.
Whipped cream’s incorporated air creates the unique texture in no-churn ice cream. The cherry flavor pairs perfectly with the rich vanilla base to create a “deliciously sweet, creamy treat”.
Proper softening techniques for assembly
Your ice cream needs the right softening level for assembly. The fridge method works best – leave ice cream there for 30 minutes, then briefly rest it on the counter. Another option is microwaving at 30% power for 30 seconds.
Fat content, container size, and air temperature affect counter softening time, which takes 10-30 minutes. Ice cream reaches the right consistency when “you can press gently in the middle with your finger to create a ¼-inch indentation”.
Adding alcohol to improve texture when frozen
Alcohol makes frozen texture better because it “doesn’t freeze”. Water freezes at 32°F while pure alcohol freezes at -173°F, which lowers ice cream’s freezing point.
Add 3-5 tablespoons of 80-proof liquor per quart of ice cream base for optimal results. This stops large ice crystals from forming and ensures a “beautifully smooth texture right out of the freezer”.
Alcohol adds depth to flavor too. Whiskey works great with vanilla and chocolate bases, while fruit-flavored liqueurs like Kirsch complement cherry ice cream. A well-prepared ice cream component will give your Cherry Brownie Ice Cream Sandwiches the perfect scoop-ability and texture.
Professional Assembly Techniques
Assembling Cherry Brownie Ice Cream Sandwiches takes more skill than just putting ingredients together. Professional results come from mastering the assembly process.
Timing and temperature control during assembly
Getting the timing right makes all the difference. You should soften the ice cream at room temperature for 10-15 minutes until it’s workable but still holds shape. The brownie’s temperature needs careful attention too. Completely cooled brownies stick better to ice cream, though slightly warm ones create a better original seal.
“Temperature is an important factor in building this slab of ice cream sandwiches,” notes one expert baker. The brownies must be baked and cooled before assembly because “they might separate during storage if one component is warmer than the other.”
Creating even layers with professional tools
You just need even, consistent layers to make professional-quality sandwiches. An offset spatula is a great way to get smooth ice cream layers between brownies. A biscuit cutter that matches your cookie diameter will give you perfect ice cream disks for individual sandwiches.
Essential assembly tools include:
- Parchment paper to line pans
- Offset spatula to spread smoothly
- Sharp chef’s knife to make clean cuts
- Ruler to measure precise rectangles
The perfect brownie-to-ice cream ratio
The right balance of brownie and ice cream makes every bite perfect. Professional bakers suggest brownie layers about ½-inch thick with a 1-inch ice cream center. The brownies “need to be sturdy enough to hold up the ice cream without getting soggy.”
Preventing ice cream melt during construction
Speed matters most because ice cream starts softening right away. Flash freezing after assembly “locks in freshness and flavor” and keeps everything together. You should return components to the freezer whenever ice cream edges start to soften.
The best results come from pressing down firmly on the top brownie before freezing. This step “ensures the three layers are snuggly combined,” and your Cherry Brownie Ice Cream Sandwiches will keep their shape from freezer to plate.
Storage and Serving Secrets
Your Cherry Brownie Ice Cream Sandwiches can last for weeks with the right storage methods that preserve their texture and flavor.
Cool off in the sweetest way with these irresistible Cherry Brownie Ice Cream Sandwiches!
Proper wrapping techniques to prevent freezer burn
Ice cream surfaces can develop dry, discolored patches when moisture evaporates, which affects both texture and taste. These steps provide the best protection:
- Press plastic wrap directly against exposed ice cream surfaces before replacing lids to create an airtight seal
- Individually wrap each sandwich in wax paper or parchment paper and secure with foil to maximize protection
- Create DIY waxed foil by brushing neutral oil on tin foil’s shiny side and pressing parchment against it to make specialized wrapping
“A freezer full of individually-wrapped ice cream sandwiches means I never show up empty handed,” notes one experienced baker, showing how good wrapping keeps quality and convenience intact.
Optimal freezer temperature settings
The right temperature is vital to maintain perfect texture. Your freezer should be set to 0°F (-18°C) or colder to preserve the ice cream’s structure. The freezer door experiences temperature changes frequently, so store sandwiches deep in the main compartment where temperatures stay stable.
An open container of water in your freezer helps control humidity, which reduces ice crystals and slows food dehydration.
Ideal thawing time before serving
Cherry Brownie Ice Cream Sandwiches need the right thawing time to achieve perfect balance between soft brownie and creamy ice cream. Here’s what works best:
- Refrigerator method: Move sandwiches to refrigerator 30 minutes before serving
- Countertop method: Let them sit at room temperature for 10-15 minutes
- Combined approach: Keep in refrigerator for 45 minutes then leave on counter for 10 minutes
Cutting techniques for clean edges
You can create professional-looking servings with sharp edges by:
- Heat your knife under hot water between cuts
- Use a serrated knife to slice through frozen brownies cleanly
- Wipe the blade clean between slices to avoid smudging
These storage methods help your Cherry Brownie Ice Cream Sandwiches stay delicious for up to a month in the freezer, making sure you get the most enjoyment from your dessert.
Conclusion
Cherry Brownie Ice Cream Sandwiches prove how science and culinary artistry work together perfectly. Careful attention to brownie composition, cherry preparation, and ice cream consistency helps create restaurant-quality frozen treats in your kitchen.
The details make these sandwiches exceptional. The right brownie’s fat-to-flour ratio, premium cherry selection, and proper ice cream temperature control are crucial. Professional assembly techniques help create sandwiches that stay tender even when frozen.
Tests show these treats keep their quality up to one month at 0°F when wrapped and stored properly. Let them sit for 10-15 minutes before serving. This allows the brownies to soften while the ice cream stays firm.
These impressive desserts ended up rewarding your effort with delightful results consistently. The techniques and insights will help you create Cherry Brownie Ice Cream Sandwiches perfect for any special occasion or gathering.
 About HealthyBlog365
Welcome to HealthyBlog365, your go-to destination for all things food and drink. We believe that every meal is not just a way to nourish your body but also a meaningful connection with yourself and your loved ones.
HealthyBlog365 was created with a mission to inspire healthy living through nutritious meals and refreshing beverages. Here, you’ll discover a treasure trove of creative recipes, kitchen tips, and healthy eating trends tailored to fit modern lifestyles.
 What can you find on HealthyBlog365?
- Delicious and easy-to-make recipes: From simple meals for busy mornings to wholesome dinners for family gatherings, we’ve got you covered for every occasion.
- Nutritious drinks: Explore recipes for juices, smoothies, detox teas, and drinks that cleanse your body, boost your mood, and energize your day.
- Guides on eating habits: Get detailed insights into popular diets like keto, low-carb, and vegetarian-friendly meal plans.
- Kitchen hacks: Discover smart tips to save time, preserve food, and cook more efficiently.
We are committed to providing high-quality content, staying up-to-date with the latest trends, and maintaining a balance between nutrition and flavor.
 Connect with HealthyBlog365 on Social Media
Join the HealthyBlog365 community on social media platforms to stay updated with our latest posts, watch exciting tutorials, and share your food stories with us:
 Facebook: Follow us here to stay updated with our latest posts and join our community.
 Instagram: Check us out here for inspiring visuals and ideas.
- Pinterest: Pin with us here to save creative ideas you’ll love.
 YouTube: Subscribe here for detailed tutorials and exciting videos.
 Thank You for Supporting HealthyBlog365!
We aim to build a connected community where everyone can share and learn from each other. If you have any questions or suggestions, don’t hesitate to reach out to us via social media or our website.
We hope you have a wonderful time on HealthyBlog365 and find new inspiration for your healthy culinary journey!

Cherry Brownie Ice Cream Sandwiches
 Prep Time 15 minutes Cook Time 25 minutes Total Time 40 minutes
 Description
Ingredients
- 1 box brownie mix about 18 oz
- 2 large eggs
- 2 pints premium cherry ice cream
- 1 cup fresh cherries pitted and chopped
- Whipped topping optional
Instructions
- Preheat your oven to 350°F (175°C). Grease a baking dish.
- Prepare the brownie mix according to package instructions, adding eggs as required.
- Pour the batter into the dish and bake for 20-25 minutes until a toothpick comes out clean with moist crumbs.
- Allow brownies to cool completely on a wire rack before cutting them into squares.
- Scoop cherry ice cream onto half of the brownie squares and spread evenly.
- Top each with another brownie square, gently pressing down to create sandwiches.
- Serve immediately or freeze briefly for easier handling.