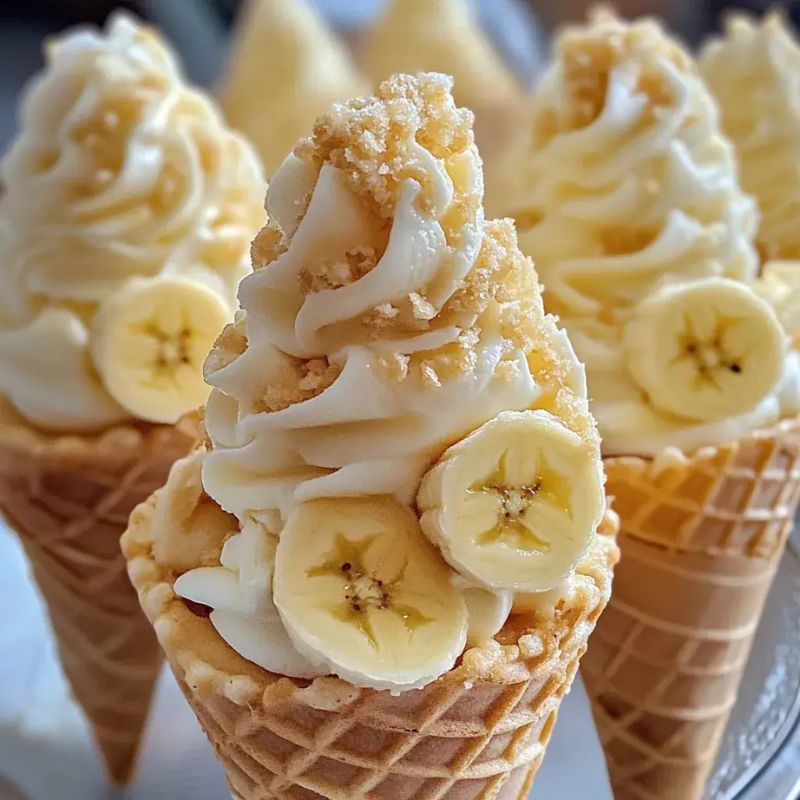
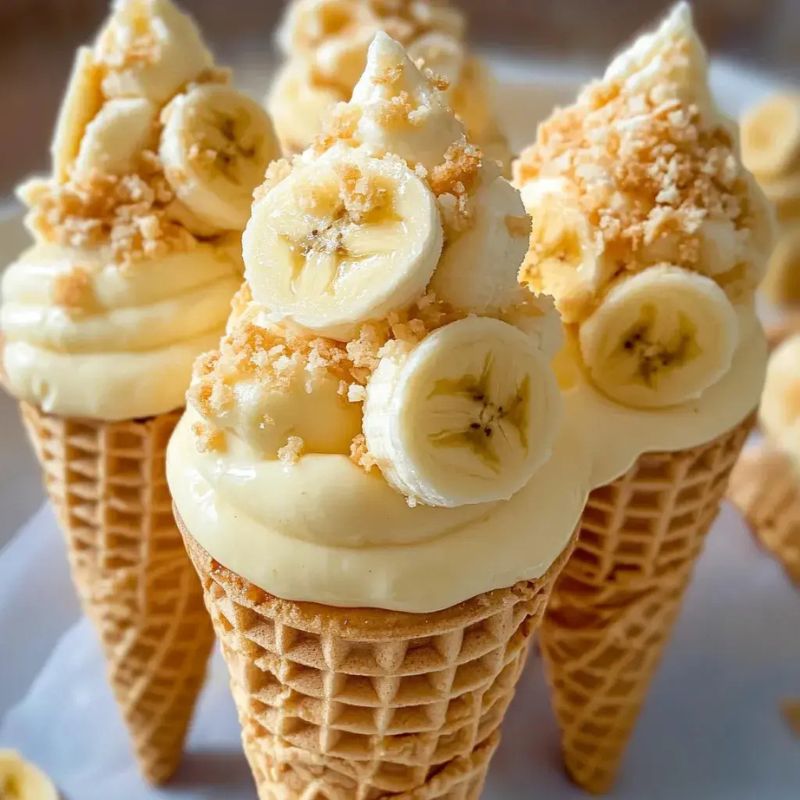
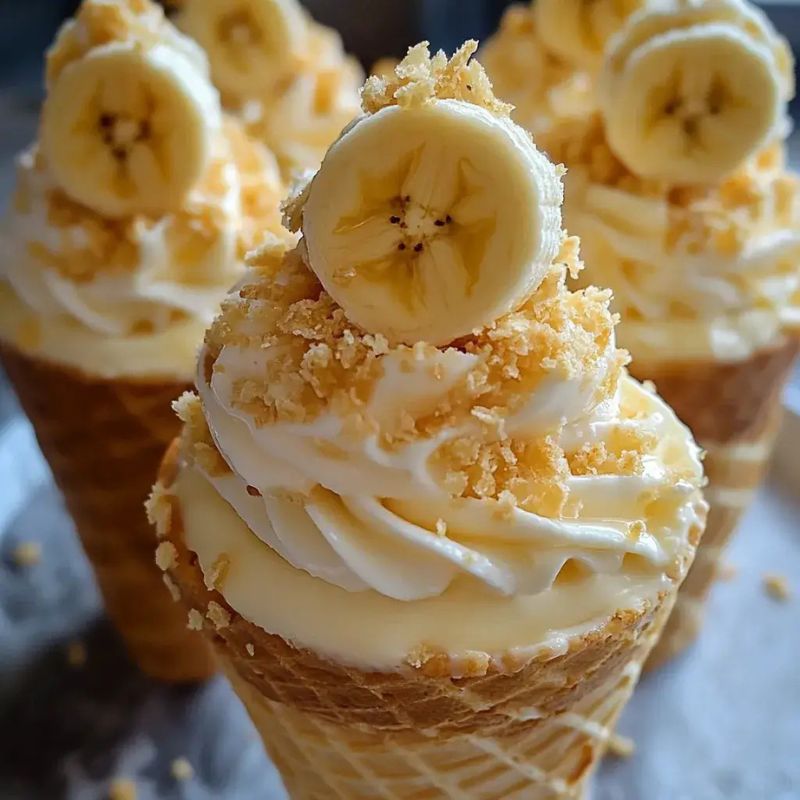
There’s something magical about a dessert that combines the creamy richness of cheesecake with the nostalgic sweetness of banana pudding. Enter Banana Pudding Cheesecake Cones, a playful twist on two beloved classics that’s sure to delight dessert lovers. These irresistible Banana Pudding Cheesecake Cones are served in crispy waffle cones and topped with sliced bananas, whipped cream, and crushed vanilla wafers, making them as visually stunning as they are delicious.
Perfect for parties, family gatherings, or any celebration, Banana Pudding Cheesecake Cones are incredibly easy to prepare and guarantee to impress. Whether you’re craving a fun dessert for kids or a decadent treat for yourself, this recipe offers the perfect mix of creamy, crunchy, and fruity flavors, making it a must-try for any occasion.
Easy Praline Crunch Recipe – A Sweet & Crunchy Southern Treat
Ingredients – What You’ll Need for Banana Pudding Cheesecake Cones
Here’s a simple list of all the ingredients you’ll need to whip up these Banana Pudding Cheesecake Cones. Gather these items, and you’re already halfway to dessert perfection!
Main Ingredients 🍌🍦
- Cream cheese – 8 ounces, softened, for a rich and creamy cheesecake base.
- Granulated sugar – 1 cup, to add the perfect amount of sweetness.
- Vanilla extract – 1 teaspoon, for a touch of fragrant warmth.
- Sour cream – 1 cup, to bring tanginess and balance to the cheesecake filling.
- Heavy cream – 1 cup, whipped for a fluffy and light texture.
- Banana puree – ½ cup (about two ripe bananas), for natural sweetness and flavor.
- Crushed vanilla wafers – ½ cup, for a subtle crunch folded into the cheesecake mixture.
- Waffle cones – 12, to hold your creamy filling and provide a satisfying crunch.
- Bananas – 2, sliced, for a fresh and fruity topping.
- Whipped cream (optional) – For garnish and a touch of elegance.
- Additional crushed vanilla wafers (optional) – For sprinkling over the top for extra texture.
Substitutions and Additions
One of the best things about this Banana Pudding Cheesecake Cones recipe is how customizable it is! Whether you’re accommodating dietary preferences or looking to get creative, here are a few substitutions and optional upgrades:
Gluten-Free Options 🌾🚫
✔️ Use gluten-free waffle cones and gluten-free vanilla wafers to make this dessert accessible to everyone.
Flavor Enhancements 🍫🍯
✔️ Drizzle caramel or melted chocolate over the cones for an extra indulgent touch.
✔️ Add a spoonful of peanut butter to the cheesecake filling for a nutty twist.
Seasonal Spices 🍂✨
✔️ A sprinkle of cinnamon or nutmeg in the cheesecake filling can add warmth and depth, making this recipe perfect for fall or holiday occasions.
Fresh Fruit Additions 🍓🍍
✔️ While bananas are the star of this dessert, you can also add:
- Sliced strawberries for a fruity burst.
- Raspberries for a tangy contrast.
- Pineapple chunks for a tropical twist.
Step-by-Step Instructions – How to Make Banana Pudding Cheesecake Cones

Creating Banana Pudding Cheesecake Cones is not only simple but also incredibly fun! Follow these easy steps to bring this creamy, crunchy delight to life.
1. Preparation – Getting Everything Ready 🛠️🍌
Before you begin mixing and assembling, take a few moments to prepare your ingredients and workspace. Proper preparation ensures a smooth and enjoyable experience.
Set Up Your Workspace
✔️ Clear your kitchen counter and gather all the necessary tools, including:
- A large mixing bowl
- An electric mixer
- A piping bag (or a zip-top bag with the corner snipped off for easy piping)
Soften the Cream Cheese
✔️ Remove the cream cheese from the fridge about 30 minutes before starting.
✔️ Softened cream cheese blends more easily, creating a smooth and creamy texture.
Ripen Your Bananas for Maximum Flavor
✔️ If your bananas aren’t fully ripe, try these quick tricks:
- Place them in a paper bag for a few hours.
- Microwave them for 15–20 seconds to soften instantly.
✔️ Ripe bananas add natural sweetness and intense banana flavor to the cheesecake mixture.
💡 Now that your ingredients are ready, it’s time to mix the magic! 🎉
2. Mixing – Creating the Creamy Cheesecake Filling 🥣🍦
This step is where the creamy, dreamy filling comes together. Take your time to blend everything into a luscious mixture.
Cream the Base
✔️ In a large mixing bowl, beat the softened cream cheese using an electric mixer until it’s smooth and lump-free.
✔️ This step is essential for a creamy texture, so mix thoroughly!
Add Sweetness and Flavor
✔️ Gradually mix in the granulated sugar and vanilla extract, beating until the sugar dissolves and the mixture becomes light and fluffy.
Incorporate the Tanginess
✔️ Blend in the sour cream for a subtle tang that balances the sweetness of the filling.
Whip it Up
✔️ Slowly pour in the heavy cream while mixing, allowing it to fluff up the texture.
Fold in the Bananas and Crunch
✔️ Gently fold in the banana puree and crushed vanilla wafers using a spatula.
✔️ The puree adds a fruity sweetness, while the wafers bring a delightful crunch.
💡 Your cheesecake mixture is now silky smooth and ready to be chilled! ❄️
3. Forming and Shaping – Assembling the Cones 🍦✨
The assembly process is where this dessert starts to shine—each cone becomes a fun, edible masterpiece!
Chill the Filling
✔️ Cover the cheesecake mixture with plastic wrap and refrigerate for 30 minutes.
✔️ Chilling helps the filling firm up, making it easier to pipe into the cones.
Prepare the Cones
✔️ While the filling chills, stand the waffle cones upright in a cone holder or arrange them carefully on a tray to prevent tipping.
Fill the Cones
✔️ Spoon or pipe the chilled cheesecake filling into each cone, filling them about ¾ full to leave room for toppings.
💡 This step is quick and easy, setting the stage for the finishing touches! 🎨
4. Finishing Touches – Toppings for the Perfect Presentation 🍌🍫
Now for the fun part—adding toppings that make these cones not only delicious but also a feast for the eyes!
Layer the Toppings
✔️ Add a dollop of whipped cream on top of each cone.
✔️ Place a few slices of banana on top. The contrast between the creamy filling and fresh fruit is irresistible!
Sprinkle Some Crunch
✔️ Finish with a sprinkle of additional crushed vanilla wafers.
✔️ This final layer adds a decorative touch and a bit of crunch with every bite.
💡 Pro Tip for Perfect Presentation:
To keep the cones crisp and fresh, assemble just before serving. This prevents the cones from softening and ensures the best texture!
Why You’ll Love This Recipe – The Best Banana Pudding Cheesecake Cones
There are so many reasons why Banana Pudding Cheesecake Cones are destined to become your new favorite dessert. This recipe is the perfect blend of creamy, crunchy, and fruity flavors—all wrapped up in a fun, handheld treat! Here’s why you’ll love it:
1. A Unique Fusion of Flavors 🍌🍰🍦
This recipe brilliantly combines two beloved desserts—banana pudding and cheesecake—into one playful, irresistible treat. The creamy banana cheesecake filling paired with the crispy waffle cone creates a perfect harmony of textures and flavors:
✔️ Rich and velvety cheesecake meets sweet banana pudding goodness.
✔️ Crunchy waffle cones add the perfect contrast to the silky filling.
✔️ Hints of vanilla wafers bring an extra layer of nostalgia to every bite!
💡 The result? A dessert experience like no other—delicious, satisfying, and completely unforgettable!
2. Fun for All Ages 🎉
✔️ Kids will LOVE the playful presentation! 🍦 Who wouldn’t enjoy a cheesecake-filled cone?
✔️ Adults will appreciate the nostalgic flavors of banana pudding with a gourmet twist.
✔️ Perfect for sharing—this dessert is a guaranteed crowd-pleaser at any gathering!
💡 Whether you’re young or young at heart, these Banana Pudding Cheesecake Cones bring smiles to everyone at the table! 😊
3. No-Bake Simplicity – Quick & Easy! ⏳🔥
No oven? No problem! This is a 100% no-bake recipe, making it:
✔️ Fast & convenient—whip it up in no time!
✔️ Perfect for hot summer days when you don’t want to turn on the oven.
✔️ Beginner-friendly—even if you’re not a baker, you can still impress with this easy treat!
💡 No complicated techniques, just a few simple steps = a delicious, stress-free dessert!
4. Perfect for Any Occasion 🎊
Looking for a fun and delicious dessert that fits any celebration? 🎂🍾 These cones are:
✔️ Ideal for birthdays, picnics, and parties—portable and easy to serve!
✔️ A hit at holiday gatherings—perfect for Christmas, Thanksgiving, and Easter!
✔️ A great way to satisfy sweet cravings—whether you’re alone or with family!
💡 No matter the occasion, Banana Pudding Cheesecake Cones make it extra special!
5. Customizable for Every Taste 🍫🍓🥜
One of the best things about this recipe? You can make it your own! 💡
✔️ Want extra indulgence? Drizzle caramel, chocolate, or peanut butter sauce.
✔️ Love fruit? Add strawberries, raspberries, or pineapple for a tropical twist.
✔️ Prefer a crunchier bite? Sprinkle crushed nuts or candy pieces on top!
💡 This recipe encourages creativity—mix, match, and create your own signature cones!
Serving Suggestions – The Best Ways to Enjoy Banana Pudding Cheesecake Cones
Banana Pudding Cheesecake Cones are the ultimate treat for any occasion—whether casual or formal. Their whimsical presentation and delightful flavors make them a perfect choice for any gathering.
Occasions & Pairings – When to Serve Banana Pudding Cheesecake Cones 🎉🍌🍦
1. Brunch Gatherings ☕🥞
✔️ Add a sweet and refreshing twist to your next brunch by serving these cones as a dessert.
✔️ Pair them with fresh fruit platters and savory dishes for a balanced menu.
✔️ The light, creamy texture makes them perfect for morning indulgence without being too heavy.
2. Parties & Celebrations 🎊🎂
✔️ A guaranteed hit at birthday parties, baby showers, and holiday gatherings.
✔️ Their individual serving size makes them easy to grab and enjoy—no plates, no mess!
✔️ Kids and adults alike will love the fun, handheld format.
3. Festive Treats for Special Occasions 🎄🍂🐰
✔️ Impress guests during the holidays—serve these cones at Easter, Thanksgiving, Christmas, or New Year’s Eve parties.
✔️ Pair them with other seasonal desserts like pecan pie, pumpkin spice treats, or Christmas cookies for a festive dessert spread.
✔️ Add holiday-themed sprinkles or colored drizzles to match the occasion.
4. The Perfect Drink Pairings 🍹☕
To enhance the flavors of Banana Pudding Cheesecake Cones, pair them with:
✔️ Iced coffee – The bitterness of coffee balances the sweet, creamy filling.
✔️ Sweet tea – A Southern-inspired pairing that complements the banana and vanilla flavors.
✔️ Sparkling lemonade – The tangy, citrusy notes create a refreshing contrast.
✔️ Milkshakes or smoothies – For an extra creamy dessert experience!
💡 Pro Tip: Serve with mini dessert forks or small napkins for easy, mess-free enjoyment!
Presentation Ideas – Make It Instagram-Worthy! 📸✨
A stunning presentation makes these cones even more irresistible! Follow these styling tips to elevate your dessert game:
1. Use Decorative Cone Holders 🍦
✔️ Place each cone in a colorful holder or cone stand for an elegant display.
✔️ If serving at a large event, arrange them on a tiered dessert stand for an eye-catching presentation.
✔️ For a rustic touch, place the cones in a mason jar filled with crushed vanilla wafers.
2. Layer Toppings with Care 🍌🍫
✔️ Pipe the whipped cream neatly for a picture-perfect swirl.
✔️ Add thin banana slices and sprinkle crushed vanilla wafers evenly for a beautiful contrast of textures and colors.
✔️ Garnish with a dusting of cinnamon or nutmeg for a warm, cozy touch.
3. Add a Touch of Flair 🎨✨
✔️ Drizzle caramel or melted chocolate over the cones to take the presentation to the next level.
✔️ Garnish with a whole vanilla wafer cookie for extra crunch and visual appeal.
✔️ Sprinkle gold dust or edible glitter for an elegant, celebratory vibe.
💡 Final Pro Tip: Assemble the cones just before serving to keep them crispy, fresh, and visually stunning!
Storage and Reheating – How to Keep Banana Pudding Cheesecake Cones Fresh 🍌🍦
To enjoy Banana Pudding Cheesecake Cones at their best, proper storage is key! Follow these easy storage tips to keep the filling creamy, the cones crisp, and the toppings fresh.
Storage Tips – Keeping Everything Fresh & Delicious
Since Banana Pudding Cheesecake Cones contain fresh bananas, whipped cream, and delicate waffle cones, the best way to store them is to keep the components separate until serving.
1. Storing the Cheesecake Filling 🥄
✔️ Transfer the cheesecake mixture to an airtight container and refrigerate for up to 2 days.
✔️ This prevents the filling from absorbing unwanted fridge odors while maintaining its creamy texture.
✔️ Do not freeze—freezing can cause the dairy ingredients to separate, resulting in a grainy texture.
💡 Pro Tip: If the cheesecake filling thickens too much in the fridge, give it a quick whisk before piping it into the cones.
2. Keeping the Toppings Fresh 🍌🍫
✔️ Store banana slices and whipped cream separately to maintain their texture.
✔️ Prevent banana browning by squeezing a little lemon juice over the slices before storing.
✔️ Keep whipped cream in an airtight container or use canned whipped cream for easy topping at the last minute.
💡 Pro Tip: For an extra-fresh look, slice the bananas just before serving!
3. Storing Waffle Cones for Maximum Crispness 🍦
✔️ Keep waffle cones in a cool, dry place, away from humidity.
✔️ Do not refrigerate or freeze—moisture will make them soft and soggy.
✔️ Store them in their original packaging or an airtight container to prevent exposure to air.
💡 Pro Tip: If your cones have lost their crispness, reheat them in the oven at 300°F (150°C) for 2–3 minutes to restore their crunch!
Reheating & Assembling – Bringing Back That Freshly-Made Taste!
Since Banana Pudding Cheesecake Cones are a no-bake dessert, reheating isn’t usually necessary. However, here’s how to refresh and assemble them for the best experience:
1. Refresh the Cheesecake Filling
✔️ Remove the cheesecake filling from the fridge and let it sit at room temperature for 10 minutes.
✔️ Give it a quick whisk or stir to make it light and creamy again before piping.
2. Crisp Up the Waffle Cones (If Needed) 🍦
If the cones have softened, follow these steps to restore their crunch:
✔️ Preheat your oven to 300°F (150°C).
✔️ Place the cones on a baking sheet and warm them for 2–3 minutes.
✔️ Let them cool completely before adding the filling to prevent melting.
💡 Pro Tip: Always assemble the cones just before serving to keep them crispy and fresh!
Make-Ahead Instructions – How to Prep Banana Pudding Cheesecake Cones in Advance
If you’re hosting an event or simply want to save time, this recipe is perfect for prepping ahead! With just a little advance preparation, you can enjoy stress-free assembly and fresh, delicious cones when you’re ready to serve.
How to Prep Ahead for the Best Results ⏳🍌🍦
1. Prepare the Cheesecake Filling Ahead of Time 🥄
✔️ Mix the cheesecake filling and transfer it to an airtight container.
✔️ Refrigerate for up to 24 hours before serving.
✔️ Before piping into the cones, give it a quick stir to restore its creamy texture.
💡 Pro Tip: Store the filling in a piping bag in the fridge for an easy and mess-free assembly when you’re ready to serve!
2. Keep Banana Slices Fresh 🍌
✔️ Slice the bananas a few hours before serving.
✔️ Store them in an airtight container with a splash of lemon juice to prevent browning.
💡 Pro Tip: If you want extra-fresh bananas, slice them right before assembling for the best flavor and texture!
3. Store the Waffle Cones for Maximum Crispness 🍦
✔️ Keep the waffle cones in their original packaging or an airtight container.
✔️ Store them in a cool, dry place, away from moisture to prevent sogginess.
💡 Pro Tip: Do not refrigerate or freeze the cones—this will make them lose their crunch!
4. Assemble Just Before Serving for the Best Texture
With everything prepped, assembling the cones takes just minutes!
✔️ Fill each cone ¾ full with the cheesecake mixture.
✔️ Top with banana slices, whipped cream, and crushed vanilla wafers.
✔️ Serve immediately to keep the cones crisp and fresh.
💡 Pro Tip: For large gatherings, set up a “dessert station” where guests can assemble their own cones for a fun and interactive experience! 🎉
Recipe FAQ – Expert Tips & Common Questions
Baking & Cooking Tips
1. Get the Perfect Texture 🥄
✔️ Soften the cream cheese before mixing for a smooth filling.
✔️ Gently whip the heavy cream to avoid overbeating.
✔️ Too thick? Fold in extra whipped cream for a lighter texture.
💡 Pro Tip: Use an electric mixer on medium speed for a velvety filling!
2. Maximize Sweetness 🍌
✔️ Use ripe bananas for natural sweetness.
✔️ Not ripe enough? Mash with a teaspoon of sugar and let sit for a few minutes.
💡 Bonus Tip: Roast bananas at 350°F (175°C) for 10 minutes for a deeper flavor!
Troubleshooting – Avoid Common Mistakes
1. Keep Cones Crispy 🍦
✔️ Assemble just before serving to prevent sogginess.
✔️ Store cones in an airtight container to keep them crisp.
✔️ Alternative: Serve filling in mini dessert cups for a no-mess option.
2. Adjusting Sweetness 🍯
✔️ Too sweet? Reduce granulated sugar slightly.
✔️ Not sweet enough? Drizzle honey, caramel, or extra wafers on top.
✔️ Want balance? Add a pinch of sea salt or cinnamon.
Serving FAQ – Portioning & Gifting Ideas
1. How Many Cones Does This Recipe Make? 🍦
✔️ Yields 12 cones, perfect for small to medium gatherings.
✔️ Need more? Double the ingredients for larger events.
💡 Pro Tip: Use mini cones or cut in half for bite-sized treats!
2. Gifting Ideas 🎁
✔️ Wrap assembled cones in cellophane bags with a ribbon.
✔️ DIY Dessert Kit: Pack filling, cones, and toppings separately in a gift box.
✔️ Include a handwritten note with assembly instructions.
💡 Perfect for: Party favors, holiday gifts, birthdays & teacher appreciation!
Conclusion – The Perfect Sweet Treat 🍌🍦
Banana Pudding Cheesecake Cones combine creamy, fruity, and crunchy textures into an unforgettable dessert. From the smooth banana-infused cheesecake filling to the crisp waffle cone and delicious toppings, every bite is a perfect balance of flavor and texture.
Whether you’re hosting a party, craving a no-bake treat, or looking for something unique, this recipe is a must-try for any occasion!
✨ Easy to make, fun to eat, and guaranteed to impress! 🎉
📌 About HealthyBlog365
Welcome to HealthyBlog365, your go-to destination for all things food and drink. We believe that every meal is not just a way to nourish your body but also a meaningful connection with yourself and your loved ones.
HealthyBlog365 was created with a mission to inspire healthy living through nutritious meals and refreshing beverages. Here, you’ll discover a treasure trove of creative recipes, kitchen tips, and healthy eating trends tailored to fit modern lifestyles.
💡 What can you find on HealthyBlog365?
- Delicious and easy-to-make recipes: From simple meals for busy mornings to wholesome dinners for family gatherings, we’ve got you covered for every occasion.
- Nutritious drinks: Explore recipes for juices, smoothies, detox teas, and drinks that cleanse your body, boost your mood, and energize your day.
- Guides on eating habits: Get detailed insights into popular diets like keto, low-carb, and vegetarian-friendly meal plans.
- Kitchen hacks: Discover smart tips to save time, preserve food, and cook more efficiently.
We are committed to providing high-quality content, staying up-to-date with the latest trends, and maintaining a balance between nutrition and flavor.
💻 Connect with HealthyBlog365 on Social Media
Join the HealthyBlog365 community on social media platforms to stay updated with our latest posts, watch exciting tutorials, and share your food stories with us:
- 📘 Facebook: Follow us here to stay updated with our latest posts and join our community.
- 📸 Instagram: Check us out here for inspiring visuals and ideas.
- 📌 Pinterest: Pin with us here to save creative ideas you’ll love.
- 🎥 YouTube: Subscribe here for detailed tutorials and exciting videos.
🌟 Thank You for Supporting HealthyBlog365!
We aim to build a connected community where everyone can share and learn from each other. If you have any questions or suggestions, don’t hesitate to reach out to us via social media or our website.
We hope you have a wonderful time on HealthyBlog365 and find new inspiration for your healthy culinary journey!

Banana Pudding Cheesecake Cones
 Prep Time 20 minutes Total Time 19 minutes
 Description
Ingredients
- cream cheese, softened
- granulated sugar
- vanilla extract
- sour cream
- heavy cream
- banana puree (about 2 ripe bananas)
- crushed vanilla wafers
- waffle cones
- bananas, sliced
- Whipped cream, for garnish
- Additional crushed vanilla wafers, for garnish
Instructions
- Beat softened cream cheese in a large bowl until smooth.
- Mix in sugar and vanilla extract until combined.
- Add sour cream and heavy cream, blending until creamy.
- Fold in banana puree and crushed vanilla wafers.
- Chill the mixture for 30 minutes in the refrigerator.
- Pipe or spoon the chilled mixture into waffle cones.
- Top with sliced bananas, whipped cream, and crushed vanilla wafers.
- Serve immediately and enjoy!